


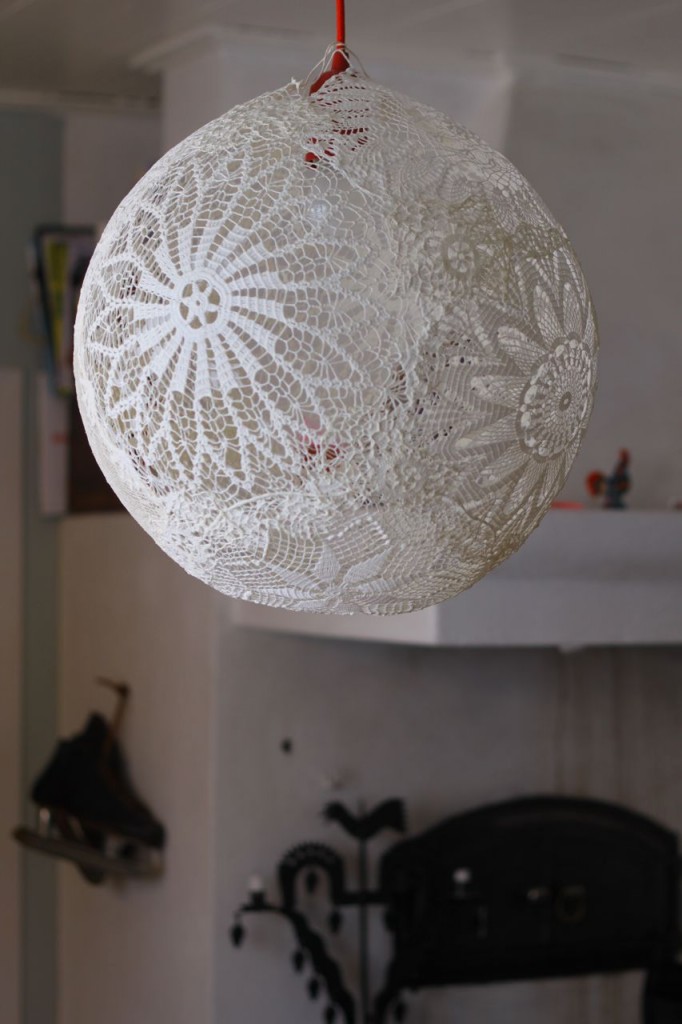
Lace lamp/Doiliy Lamp – DIY


We are at our little cottage in Dalarna and we are fixing it up. So we are able to use it even in the winter.
(Dalarna is in th middle/north of Sweden. To me and Jenny it’s north but Sweden is a very tall country so I guess we are not even in the middle).
Anyway it’s great cause I have the time and space to do lots of DIY projects.
Starting with this lamp.
(It is so dark here at the moment – cant get the photos so crisp that I like).
But the lamp is easy to make an truly a beauty.

First we used a huge baloon that I bought at a party store.

Then you collect all the old Dollys (?) crochet or lace small tablecloths.
I found mine at a flea market.

Paint them with lots of wallpaper glue so they are soaked.

Hang the ballon on a string and put the soaked lace on the baloon. They have to overlap eachother so they will stick together and connect.
I always put on onother coat of extra glue when thay are all on the baloon.
Just to be sure.


Then wait for a while. Maybe a whole night.

Pop the baloon when the glue is dry. And attach a nice looking cord and lamp fitting.
Voilá a new lamp!

Update 1:
Some of you asked how to get the bulb into the shade. I simply cut open a little tear on top.
Later I am going to sew the tear nicely so you won’t even notice it and also connect it to the cord. But I want a big round bulb first and I havn’t found one yet in this little village I am in.
Someone also asked about fire safety. Well, I think if you make the ball large enough that it won’t come close to the bulb it’s ok.
It’s also possible to use a energy saving lamp – they are almost cold. Also the “shade” breaths a lot so it is not going to be to hot.
You mos def want to use a LED lamp or a energy saving bulb because it’s cold and it will not affect the glue either.
I bought a nice looking iron wire in pink but when I opened the box it was red. It will do for now. But I want the pink one later.
Update 2: Problems making the lamp?!
I have had so many incredibly responses to this lamp – thanks!
Many of you have a problem making this. I honestly don’t understand why. It has worked for me every time.
When thinking about it I come up with different ideas/solutions.
1. It’s possible that wallpaper glue consists of different things in different countries. I just bought already mixed glue at a hardware store. Some of you are talking of different kind of molds but unfortunately we don’t have them in Sweden so I can’t give my opinion about those.
2. The balloon. I used a larger, round balloon. In Sweden party stores and some toy stores carries them. The a round and more important a little bit thicker! I mean there is a big difference between balloons and ballons – every kids party has told me that. So make sure you find a hard strong balloon!
Some has used a beach ball but I think it’s to stiff and also hard to get out of the doily ball.
3. For some of you the doilies doesn’t stick to the balloon. I don’t know why.I simply lay them on top of the balloon then made sure the doilies overlapped eachother. You can also do one side – let it dry and then flip sides. Mine stuck all the way around from the start.
4. For some of you the balloon stuck to the doilies to hard. I guess after popping them? For me this was never the problem as well. I just punshed the balloon with a needle and it shrunk by itself. Once it schrunk brining a part of the lace with it (kind of collapsing. Then I blew another balloon inside of the big doilie bal and put extra glue/doilies on top of the shrunken part and the it worked. Some of you used plastic wrap underneath or even some Vaseline. I hope that works.
5. Picking doilies. I used not very thick but also not the finest of treads. When the doilies had to many “holes” in the lace it was harder to get it stiff. And the overlapping part is important. It makes the whole unit stronger
6. The Bulb. It’s important to use a bulb which is cold. Otherwise it can affect the glue.
7. Next time I make one I think I will use wood glue after the doilies is dry and stiff. Put a little layer of wood glue and use the hairdryer so it hardens nicely. Then I think it will be even harder.
8.Good luck!
I wish I had more answers. You can also go through the comments and see what has worked for different readers!
xxx
Isabelle
If You want to link to this post please share with love.
You can us 1 or 2 images from this post but then please link back to us! Thank you!
715 Comments
Join the discussion and tell us your opinion.
[…] har gjort en ny lampa av gamla dukar. Se på dosfamily hur jag gjorde. klick klick. Kategori: DIY Av Isabelle Mcallister OAS_AD('k2a1'); […]
[…] en sån här lampa bara måste jag testa på! Har liggande en massa spetsar som jag inte vet vad jag skall tillverka […]
Oh my goodness, this is beautiful!! I can’t wait to try this project! Thanks for sharing.
MUITO INTERESSANTE ESTA SUA IDÉIA, GOSTEI MESMO, VOU FAZER EM CASA…
Beijos izabelle
hi,
i thoght that i could do it with gypsum insted of old Dollys…
didnt work.
do you have any idea hoe can i make a round bowl?
thanks!
If you want to make a round bowl out of doilies… You can find cornstarch spray at your local craft store… Or you can make your own mixture of cornstarch an water. You dip the doily in the cornstarch or spray it making sure to get all of it covered. You turn a bowl upside down and drape it over the bowl to let it dry. After it’s dry just take it off the bowl and you will have a doily bowl. Downside to this is if it ever gets wet or if you wash it, you’ll have to restarch it.
This one is a pretty good idea to make my living room very delightful. Thank you very much for your guiding buddy.
This is really great idea.
Så jäkla fin! Något likt detta skulle vara så himlans fint i vårt sovrum, det får nog bli till att fixa en sådan nu i vår. Tack för all inspiration!
This is a great idea and the lamp looks beautiful!
Wonderful, Isabelle! I love this!!
Aiai, for en FANTASTISK idé!!!!
Ja har sett bilder på andra bloggar av liknande lampor, o har länge tänkt slå slag i saken o göra en själv. De är verkligen jättefina! En grej ja har klurat lite på bara. Hur får man själva lampsladden o sitta fast?
Hoppas de går bra om ja lånar bilden o lägger upp på min blogg.
-Sofie
okay, this ninja is not even a DIYer or that crafty but… this I HAVE TO TRY!
it looks wonderful. thanks so much for the tip! wow. impressed ninja :)
Thanks JI:)
I love it! What a great idea. I have to try this!
Hej! Jätte, jätte fin lampa! Tack för att du delar med dej av tips och ideér!
Tänkte att jag skulle göra en sådan och undrade med brandsäkerheten, bör man vara rädd över att tyget kan fatta äld?
Hmmm… Feeling a bit stupid here, but how do you get the bulb in? A hole at the bottom of the lamp?
You can leave a space at the top. Or better as she says , when done carefully cut a slit in the top insert the bulb then nicely sew it backup.
You can stretch theballoon over the (cooltype)lightbulb first,before you blow it up
.
oh wow! i’m really impressed!!
Den er bare så sej!!!!
Maria
ja det var tjusigt!
så fint, så fint!!
Efter en hel månads semester i USA är jag nu snart “back in the game”.
Ska bli så skoj att börja jobba och blogga här igen.
Du har gjort så många fina saker här på “dosan” medan jag varit borta.
/Jenny
Lovely!!! Now I’m forcing my kid to go to the local fleamarket on a bike in the snow to find the lacethings. Wow.
Verkligen jättefin!
Kommenterade en liknande lampa hos någon annan bloggare nyss… Så här kommer passande nog en återanvänd :) kommentar ; “som en måne… tillverkad av snöflingor. Poesi i inredningen!”
/helena
love your lamp, thanks for telling how you made it!
Is it okay to use one of your photos to link back to this post? I would love to share it on a dutch language inspiration blog‘Deze is ook leuk’ this coming week.
Stämmer in, fantastiskt fin!
i really like the idea! looks nice!
Väldigt snyggt (blir lite härm-sugen nu) och det såg inte så svårt ut heller(?).
fantastiskt idé! måste testa det nån gång!
looooooooooove it! en slik må jeg jammen prøve å lage! må bare finne ut hvor jeg skal henge den.
viste et bilde fra the big bow over barnesengen på bloggen min forleden. håper det var ok:-)
ha en fin dag!
En super idè og utrolig fin!! :)
Ah, such a beautiful, beautiful idea. Very clever!
Detta maste sjalvklart provas! Jag undrar hur du loste upphanhgningen?
Lovely! you make it look so simple –I have to try this out!!! Thanks for the inspiration!
jag har gjort en likadan (eller med samma teknik), men med eller av pappersnör.
It looks stunning – I’m going to make it for my girls bedroom! Just discovered your website and I love it.
M.R.
Australia
This is a brillient idea! I loved it! Especially the fact that this lamp can be made from old lace, ie giving an old lace a second life, inspired me; definatelly something we can use for our yiuco.com site! Thank you!
uh hvis man ikke er så meget til blonder kan man bruge gaze :D det blir fiint og lidt råt
AWESOME! Love this and I am doing it tomorrow… I have tons of lace but no balloons!
PS: Just watched Fixa Rummet på Bolibompa…. så bra… älskar provdockan.
hi,your idear is surprised me … so i want to translate your idea into Chinese, shareing with others on http://www.diyppick.com. Looking forward to your permission. thank you!
hi,your idear is surprised me … so i want to translate your idea into Chinese, shareing with others on http://www.diypick.com. Looking forward to your permission. thank you!
Jättefin!
Hur stor är den?
Hur/var fick du tag i en helt rund ballong
Så snygg lampa! Isabelle; du får gärna komma hem till oss och fixa grabbarnas STORA rum.
Simply wonderful!
It´s really beatiful, i love it!!!
ohhhh this is trully inspirational. I am always collecting beautiful doyles/crcohets mats from local charity shops – this will be a beautiful way to show their intricate details. thank you…I will show your blog to my daughters…be well.
great idea! can you only tell what kind of glue did you use?
wat voor kleedjes zijn dit hand gemaakt?
[…] for denne nydeligheten finner du her. :) from → DIY ← Etsy-kjærleik: Cowl Neck Pocket Tunic LikeBe the first to […]
Lovely!!!
Nice! En sån vill jag också ha! :-) (Fast jag tror det heter doily, inte dolly.)
Oh my…that is gorgeous!!! I am definitely going to try this out!!! I do have a question though…I’m not sure if I can get wall paper glue in my part of the world (I’m from the Philippines)…can you perhaps suggest an alternative to that? Do you think white elmer’s glue would be okay?
Thanks so much.
You could try white Elmer’s glue, and I have also seen this with regular laundry starch.
I think if you do a serch there is a type of hardening paste you can make out of kitchen supplies if the glue isnt found in your country, not positive but thought id mention it
oj vad fin! och vilken smart användning av alla virkade dukar jag fått av farmor. ska ta och göra den här finfina lampan. så snart jag orkar.
this is one of the prettiest things I’ve seen in a long time. I’m so going to try it :) Michelle x
[…] Dosfamily finns beskrivning på hur man […]
Vackert!!!!
Que c’est beau !
Wauv hvor er den fantastisk smuk. Kan næsten ikke vente på at komme i gang
Thanks for sharing
Amazing idea!!! Love it!!!
[…] 等不及分享Isabelle蕾丝灯罩的创意DIY,其简易的过程和华丽的结果让我震惊。摄影环境光线有点昏暗,但一点不妨碍这个小美好的过程展示。 […]
[…] A ridiculously pretty lampshade from the always inspiring Dos Family: […]
Hmmm fanns inge runda ballonger där jag bor så sonen fick offra sin badboll. Nu så håller det på och torkar. Men undrar om det går att få dän bollen.??? Så inte den blir fastklistrad den med. Var lite pillrigare än jag trodde men roligt o pyssla. tror kanske det får bli en till senare då jag har lite mer finess på det=)
[…] Lace Lamp at DosFamily […]
What a lovely idea. Thanks for sharing.
[…] starched doily basket 2. burlap doily luminaries3. lace lamp 4. doily […]
[…] kit (IKEA has them for $4) How to make a doily lamp at Dos […]
Hi! I LOVE your lamp! Have a question though- I tried to do this using a beach ball and I can’t for the life of me get the doilies to stick to the bottom. Gravity pulls the soggy things right off. How did you do it???? I am wondering if I need to get a new glue- I tried this with liquid starch. Is it the wallpaper paste that keeps them on? Do you think it’s that I’m using a beach ball? I want to make one of these so badly, but I can’t seem to figure it out. Any suggestions would be greatly appreciated! Thanks!
Thanks! I mos def thinks it’s your glue. I made several and none had the problem of not sticking. I guess a beachball would work just fine but it will be more difficult to get out of the doilly scelleton when dry.
I never used starch so I can’t tell. try wallpaper glue. Just soak them enough and then you can use more glue when they are on the ball/balloon!
Godd luck
Hi Becca. Why not sit your beachball on something to steady it and do half , wait for it to dry , rotate ball, then do the other half. I haven’t tried it but I dont see why it wouldn’t work.
Wait till the doilies at the top and sideshave dried> turn ball upside down and then paste bottom doilie overlapping existing doilies.
I just found your blog through a friend and must say I love it. It reminds me so of our time in Alaska! (how I miss picking lingonberries on the back of our property…. we live in Indiana now which is much, much different!) The outdoor beauty in your photos leave me speechless. I am doing to make one of these lamps! I do have something similar I am working on currently but it is with wire to be used in our boys’ bedroom.
[…] Love this lace lamp by Dos Family. […]
great idea! so pretty. (just seen via conversation pieces.)
Love this lamp! But where did you find these nice round balloons? Most balloons are oval, and I would really like a round one.
It’s a punch balloon like this https://www.google.com/shopping/product/16914499800994306466?q=punch+balloon&espv=214&es_sm=93&biw=1680&bih=959&sa=X&ei=azBpUvjKM5TCyAHE1oDwBQ&ved=0CG8Q8gIwAg
MAGNIFICO!!!
Hi,
I am making one right now and I did the bottom first and balanced it upside down on a bowl (I used a big, beautiful doily on the bottom)…then when it was dry I did the rest.
At the top of the balloon I put a 3″ diameter metal ring that I got at Hobby Lobby and tucked a small edge of the doilies around it to make a nice clean hole. I was going to tape the ring to the balloon, but it actually stayed fairly well without tape. I still have not figured out how I am going to do the light. I had thought of trying Christmas lights to see how that looks, but you may not get the nice shadows.
Also, I plan to use the can of air that you use to clean your computer keys to dust away any stray glue flakes and glue that is stuck in the “windows” of the doily. I actually used Modge Podge and it has done well….though I put and extra coating on it after the first application dried. I also plan to embellish mine with some crystals and ribbons.
One thing I did learn is to not use a doily that is mostly solid…it becomes too heavy with all of the glue. Make sure that your doilies are light and have lots of air spaces! This is my first one and I will do it a little differently the next time.
Very fun:)
Loved your info, I want to try this also. Where did you get your dollies? I thought about spray advesive to get the dollies set and then the overall glue. I am also going to blast with spray again when the balloon is removed and then hit with glitter. What do you think?
I have a couple questions:
I was wondering if wall paper glue is transparent when dry.
If you think this would work with synthetic satin or sheer fabric not having the air spaces a doily would have.
I want to make a lamp shade that will be made with two and a half foot fake leaves made of either satin or a sheer fabric that is a leafy green. It needs to be very firm when dry, which looks like the case from your example. I cannot layer fabric as the light will shine less through the more layers there are.
The modge podge is transparent, but I am not sure about the wall paper glue.
I wonder sometime…I would like to use a pour on acrylic for a lamp…it might be really messy but could work for you and would be very firm. You may need to make some sort of mold. Good Luck!
Hi, the wall paper glue is transparent. I don’t see why it schouldnt work on satin or sheer fabric. Take some glue on a little piece of fabric then you will see.
Thanks so much for your help!
Any certain type of glue/adhesive? I see a lot of different kinds out there, especially water-soluble types, which makes sense for wall paper.
I don’t plan on getting my lamp shade wet, but would you recommend water soluble or is there a kind you normally use?
Thanks, Again!
I just took the glue I have at home. Mostly the wallpapper glue ich is made for wet-rooms are stronger. So I use it for putting wallpaper on cupboards etc. I don’t think you have to worry to much. Its always possibly torepair the lamp or put extra glue on top of it when you have done the base.
[…] dosfamily explains, how it works to create such an amazing lamp: The lamp is easy to make and truly a beauty. […]
This is brilliant! Thanks for sharing!
[…] Ideal for leftover doilies… Posted on March 30, 2011 by isawienlady I use to love to make doilies, and have several in a box somewhere in my house. They never really were useful to me, but still I love them. Now it’s time to bring them out of the box and use them, thanks to Dos Family!! […]
[…] bet neturi šviestuvo. Taigi prireiks klijų, baliono ir servetėlių. Instrukciją rasite dosfamily.com […]
My friend and I tried this project last night. It was a huge fail. haha.
how do you keep your doilies (or in my friends case, yarn) from slipping right off of the balloon? We couldn’t for the life of us get it to stay in place.
IM sooooo gonna make this! but i just wanted to ask; what is wallpaper glue? is it just white glue, like how we use it to make paper maches? or is wallpaper a specific type of glue that is stronger? and where can i get it?
thank you so much!
Gracia,
I just bought wallpaper glue – the same as making papier machee. I don’t think this glue is much stronger. You can however use wallpaper glue for wetrooms – that glue is stronger. But otherwise just put different layers of withe glue! Good luck
Don’t know where you’re located (as in country), but in the Us wallpaper glue can be found at any hardware store, Walmart, Lowes, etc. It has a rather heavy consistency and is quite sticky. Found in the paint/paper part of stores.
You are the Queen of Awesomeness! I absolutely adore this lamp!!! Bless you for posting!
Does anyone know if this project would work if I were to use paper doilies? They seem eaiser to come by and cheaper for that matter.
Yes!! Did that myself but used Christmas lights for fear of even a energy saving bulb setting fire to it..lol.
I love the lamp and will be sharing the link to this page with my creative folks type friends. Thank You.
[…] I am so making this. […]
Wow! Excellent work! Gonna try it out here in Puerto Rico! Thank you!
What a wonderful idea, to use old crochet doilies and you get to admire them as well as being used to make a functional object! Recycling at its best, thank you so much!
Joey x
[…] a big balloon, and a wiring/lighting kit. There’s a fantastic (and super easy) tutorial at Dos Family. I love how it’s kind of grandmotherly but very of-the-moment at the same time. I might have […]
[…] made a DIY Doily Lantern {sans the lantern part} I’ve been seeing so much on Pinterest. Here it is pre-balloon pop. […]
We did something similar for our project week, but we used simple white woolen thread and covered the balloon with it (pictures are on my blog!). But I think I love this one even more! It looks so delicate and pretty. Really well done.
please link me to your blog. I was unable to find it. thx :)
Here it is! http://auxpaysdesmerveilles.wordpress.com/2011/04/17/diy-existenz-light-elements/
[…] This DIY for a lace lamp. Very similar to the lamps I posted some time […]
[…] saw these beautiful papier-mâché lace lamps over at the Dos Family blog and instantly fell in love. With my friend Cassie’s baby shower coming up, I decided to make […]
[…] via […]
Wow, I loved! Wonderful! Thanks so much for sharing!
I am totally inspired and I have everything on hand! LOOK OUT!
[…] Kaynak […]
Hi! I love this idea!! However, I was wondering if it gets really dusty and hard to clean?
Well if its get too dusty make à new one! I wouldnt worry too much
My sister and I just tried to make this for our mother for mother’s day. It came out beautiful until we tried to pop the balloon. The doilies stuck to the balloon and the whole thing shriveled up. We’re now trying to peel the balloon away from the doilies in an attempt to save it but they are really stuck! This may look like an easy project, but it’s a nightmare! Ruined at the very end after all the hard work :(
Hi
I am so sorry to hear this- I made it several times and never had a problem. The baloon just peeled of it self. What glue did you use? An idea is that the doilies didn’t had enough glue. They really need to be soaked and dry until they are firm and hard. Then the doilies will be an hard shell.
I made one lamp and a part of the round doilie ball was of very soft (fine) doilie and not hard enough. Then i just took a new baloon and blew it up inside of the hard doilieball and put on more dolieis on the soft part- and more glue. Maybe you can try this?
Good luck
Isabelle
You can’t buy the thin cheap balloons. Go to a party store and get the thick er balloons.
I love this lamp!!
I’m going to tray to do it this weekend.
How did you join the “old Dollys (?) crochet or lace small tablecloths”?
it seems to me a perfect little romantic and femenine detail for my living room.
Greetings from Chile,
Marité
thank you so much for sharing this great idea
I have a stash of doilies and was wondering what else I could do with them
besides the things I already do
I was just looking for something a little more inspiring
and this is it!!!
so thankyou, thankyou, thankyou for sharing
love it
fabulous – I love this idea for my wedding decorations – thank you so much for sharing xo
This is beautiful! I am going to make this to hang above the dance floor at my daughters wedding in December. Her theme is snowflakes and I am just going to use a paper lantern bulb and let the hall worry about how to get the rest. Maybe the band can figure it out, but it is a must!
Hi Isabelle, such a fantastic idea…so clever and easy to create….so fanastic that I had to share with my fellow blogger today…hope you dont mind ; )
All links back to your site of course .
Anna x
[…] The DIY doily lamp from More Design Please (inspired by Dos Family): […]
[…] via DOS FAMILY […]
what an amazing idea. this is truly exquisite! I hope to make one of these soon :) thank you, and thank you for your stunning site! It has been a saviour with my sleepless nights (due to the new baby) :) x
Thank you! Glad you like both site and lamp!
fabulous idea! i’m going to make one to brighten up my university room next year. thanks for the inspiring posts!
Your doily lamp is just beautiful. I’d love to try this with paper doilies for papier-mâché party decorations. Maybe they wouldn’t be strong enough, though.
I just discovered your blog through Pinterest. Amazing project! I will definitely try it with my son. It will be a fun project!
that is the coolest thanks
this is great. I will try that for sure. thanks a lot
This is a lovely idea! I’m going to get started on mine right away. I’m not quite sure where I’ll hang it but I’ll come up with something! :)
This is the neatest thing I’ve ever seen! Such a great idea and it looks so pretty!
I think that if you would wash the doilies before you put the glue on it might work better. In some cases they might have starch on them or another type of stiffener that keeps the glue from soaking in.
this is so gorgeous! Original, delicate and beautiful! Love it!!!
thea.
xx
(spoonfulzine)
Hi! I keep coming across pictures of this via StumbleUpon, and I finally clicked back to your how-to. I’m so in love with it! I honestly can’t believe I haven’t seen it on any of the wedding blogs I read. My mother has a basket of old doilies that she’s never done anything with; maybe some weekend when she’s away I’ll make one of these for her as a surprise. Thanks so much for sharing your instructions!
How long do you leave your lamp lit? I was curious if it was a potential fire hazard/ will it melt?
Emily, I use a low energy lamp which is cold so I just use it as a normal lamp. Plus it’s pretty much as a normal shade, as I made it big and airy. Just make sure you use à good fitting and not an old but that rules for all lamps, i guess . Isabelle
I’m having terrible trouble with this project. As I was midway through placing the lace on the balloon the balloon popped out of no where. I wasn’t even touching the balloon. Why do you think this happened?
Hi Leah, I don’t know but my guess is that simply the balloon couldn’t handle the weight. I mean there are loads of different quality of baloons out there. I used a large thick baloon from a party – store. Some even used a beach ball but I think that would be hard to extract from the dry doilies.. Good luck
Hi, I kept seeing this but not until I joined Pinterest did I follow the link properly. I now have a Balloon covered with Doily’s as trail run hanging to dry. If it works I will make a really huge one like yours. I tried it with Modge Podge first..that did not work for me. Now I have used Wallpaper paste and all looks okay so far. All I need to do is find a perfectly round Balloon or something similar. Thank you for such a wonderful tutorial
Hi Silvia, I don’t know what Modge Podge is, I think that maybe it would work with wood glue (mixed with some water) and then applyed in layers. But I don’t know how the balloon reacts to the wood glue. Good Luck
achei muito linda vou tentar fazer obrigada por dividir sua ideia parabens anna
really like, hop to the flea market and get to work!
LINDO! FAREI TAMBÉM NO MEU ATELIE…. OBRIGADA POR POSTAR ESSA IDEIA SUPER INTERESANTE!
lindo, vou fazer,beijos.
Quero fazer parte.Obrigada. Beth
hola isabelle,…me encanto. intentare hacerlos. felicidades
what a cool idea! i have a bunch of dollys from my grandmother, i think i would use them to make this lamp! thanks for sharing.
[…] 蕾丝一直一来都是大师们喜欢的设计元素:性感,时尚,蛊惑,带着难以阻挡的诱惑相信能让每位男人血脉膨胀吧~LED照明之家给大家介绍2011年走红网络的蕾丝创意DIY吊灯,每位观众都难以抗拒蕾丝的诱惑,感兴趣的朋友不妨按照DIY大师Isabelle的六步来走,甚至可以和家里的小孩一起动手,打造一款时尚感性创意吊灯。LED照明之家温馨TIPS:灯泡的入口处可以先开一个适当的小口,然后再勾缝起来相当灵活,在安全方面建议使用LED冷光源的节能环保灯具,使用寿命更长。 […]
[…] This project is our most commented post of all time. Isabelle´s Lace Lamp. Great weekend project. Go see it! from → Dos Family Jenny Brandt View all posts by Jenny Brandt No comments yet Click here to […]
I love this – i just followed a link from Lil Magoolie – this is wonderful I am definitely making this.
Genius! I have a few doilies laying around my house just starving for this project!!
[…] sew the lamp on top with the fitting. Enjoy- For full step by step on how to do this lamp look at DosFamily website […]
These are just brilliant! What a great idea and really easy to follow and try. Well done!
[…] Fuente: http://dosfamily.com/2011/01/lace-lamp/ […]
im trying to do this with lace from the craft store and regular balloons. i am also using wall paper paste from the hardware store. after several coats and plenty of drying time it doesnt seem to work. Ive tried three times with no success!! im wondering if there is a better glue for this or do i need to use a thicker/heavier doiles?
Joe! Well how sad. Why is it not working? Whats happening? I dont know what it could be. Maybe Wallpaper glue consist of different stuff in different countries? I made it several times and never had problems. I am sorry to hear this. Pls let me know/ Isabelle
You can get modge podge decoupag’e glue from any craft store. This is a water, glue and varnish mixture and is very durable. It works on everything.
[…] Dos family, une lampe ballon bien plus facile à réaliser qu’il n’y […]
Hi! Do you know if this project would work with paper doilies?
Thanks!
I guess it would. I dont see why not? Try some and check how Hard they become. Maybe they’ll trear and stick to the baloon.
Hi
I also tried to do this lamp but its not working for me neither. i dont know what im doing wrong but the lace are loosening and fall of ( sorry for my bad enlish) Dont know if i put to much or to little of the wallpaper glue. . . Do you have any advice ?
/Lisa
Mod-Podge will work wonderfully! I’ve used it on lots of mediums will great results!!!
This is just beautiful, I love it! I’m featuring this tomorrow on a lace roundup on my blog.
Doilies*
[…] attraktive Lampen-Selbermach-Vorschlag stammt vom weiblichen Kreativ-Duo ‘dosfamily‘ aus Schweden: Dazu ersteinmal Großmütterchens Platzdeckchen-Vorrat nach geeignetem […]
We used to do this when I was a kid, but we used Elmer’s glue and different kinds of string and twine.
I read you were looking for a pink wire, if you are still looking I can recommend the one:
http://www.nordhjem.dk/pi/Stofledning_m_fatning_Pink_3_5_meter_7943_.aspx
I am 90 % sure the will ship to sweden :)
XO
Louise
I also tried this with wallpaper paste and was unsuccessful. The minute the balloon popped, the doilies lost their shape. Has anyone actually tried this using mod- podge? I really want this to work out!
They sell battery operated light bulbs, the normal size one’s. So I thought it would be cute with that and a beautiful ribbon to hang it with! I also found paper lantern lights that are really small, but have 12 LEDS lights that light up beautifully!!! The site is…………………… http://www.save-on-crafts.com/eashalcosbry.html I love the idea! Can’t wait to make a few!!! You can find dollies at the dollar store, their white. You can use Rit dye to color them any color, such as a soft pink or butter yellow! I will try putting them into some sweet tea that I drink, to stain them creamish…. Good Luck!
[…] para esta solução, encontrei no blog More Design Please (e que montou do Dos Family) uma luminária feita todinha com essas toalinhas. Segue o passo a […]
HERMOSA Y NOVEDOSA LAMPARA FELICITACIONES, INTENTARE HACERLA
This lamp was my love at 1st sight! The idea to try to make one has been in the back of my head for a while. So a few days ago I mixed the wallpaper glue and gave it a go :) I’m really happy with the result! You’re welcome to see it here: http://lefteyedmama.blogspot.com/2011/07/light.html
Thanks a lot for this, Isabelle!
[…] Lace lamp – DIY by Dos Family This entry was posted in art, favourites and tagged doily, lace. Bookmark the permalink. ← In Bloom! […]
[…] http://dosfamily.com/2011/01/lace-lamp/ […]
Hi,
I noticed you were talking about big lightbulbs, if you are still interested I know that IKEA has some great big ones, the only downside is that if you want clean ones, they do not have them. They are energy efficient the ones they have, but personally I think they light up very nicely + they do not blind you.. :D
Thank you for that amazing tutorial, I will definetly tried. :D
[…] Lace Lamp […]
[…] (images vía: dos family) […]
I finally got around to making this, and I am IN LOVE with the way it turned out! I used cloth lace doilies I found at Joanne’s Fabric, wallpaper paste from the local department store, punching balloons from the local party store, and a “make your own lamp” kit from the local department store for the light bulb inside. It was so much easier than I was expecting it to be, just took a few days (I let it dry for 3 days because I didn’t want to risk disaster.. I personally don’t think overnight is long enough if you use a lot of glue/paste). I’ve hung it above my bed in my room and have already received so many compliments on it. Thank you, thank you, thank you!!
Simply beautiful and so elegant!
Hi There, I attempted this for my self but failed first time as I think i watered the wallpaper glue down too much..
However I do have one question – what do you do if the doily doesn’t fit the roundness of the balloon properly? do you cut a bit out or fold it?
thanks
Isabelle: well I used allready mixed glue – but I guess it would be hard if you have too much water. I just folded the doilies but cut them would work as well. Do what you think look best. Just think about that the doilies have to overlap eachother to stick.
Your shade is amazing. Just a thought. You know how you blew the ballon and used that. I wonder how it would look if you wrapped the cord and continued on the cord to the ceiling. I’ll have to give this a try with your idea and let you know how it worked out. It might be alittle too much but how do you know unless you try.
we’ve been working on these balloons for three stinkin days. Why is this not working. weve used wallpaper glue, elmers glue water mix, and fabric stifner and none of them work. our balloons look stupid. our lace looks like what weve put on. GRRRR. love, us.
Thanks so much for the idea. I needed something to do with all the doilies I make. Besides letting the kids spill stuff on them lol. Now they will be spill proof and still on display.
[…] Originalbeskrivningen på lampan (på engelska) hittar du på: dosfamily.com […]
can i put vaseline all over the ballon before i apply the glue so it wont’ stick to the ballon?
[…] hard to believe that doilies could be so intriguing and beautiful, but check out the Lace lamp DIY instructions on DosFamily. The magic of paper mache meets grandma’s hand crotched […]
[…] It’s officially another Tinkering Tuesday! So here it is ladies and gents: Lace lamp – DIY | DosFamily. […]
Linked this up to my blog yesterday for my own personal “Doily Day”! My mom just ADORES this and might be doing this with her own doilies soon. Thanks so much for sharing!
It haves to be wallpaper glue?
[…] #2: {Lace Doily Lamp by Dos Family} […]
[…] via dosfamily […]
Hiii
Im in NZ and am attempting to make little ones like this for my wedding.. but dont have enough dolies!! I wish I could find some – if anyone comes across someone selling them that will send over PLEASE let me know! :)
I tried making this recently and after letting it dry for three days I popped it today and the entire thing just deflated with the balloon :(. I dont know if you have to put vaseline on the balloon so the lace doesnt stick to it and deflate? I really dont know what went wrong and am super bummed because it wasn’t easy for me to find doilies, I suppose i’ll try again when I can find more :(
I love your blog!!!! I create happy chairs! check out my site. I also do design and events (real job) I am going to use the doily light for a barn wedding!!!! just wanted to say “cool chicks”
to Anny: mine also dried for 3 days and still felt kind of sticky. So i removed the ball (i used my children’s beach ball) really carefully and let the air out very-very slowly. Some of the doilies were too thick, so I had to use a needle+ thread to make the edges stay together.
I love the doilies because they’re super reusable – you can just wash the doilies and give it another go. Hope you will succeed! The lamp is so worth the trouble :)
Love this idea!
My daughter tried this using a punch-ball balloon but it also slowly deflated (over 2 days while the glue dried) and the doilies just shrunk with it. Do you have suggestions for a more quick-drying glue or paste? We are going to wash them and try it again. Thank you for any suggestions.
Really wonderful Isabelle! You are inspiring. Thank you for so generously sharing your tutorial. Steph x
beautiful! I’ve linked to this post on my blog.
http://jolifetoday.wordpress.com/2011/09/07/10-bits-of-awesomeness-diy-wishlist/
really beautiful..I appreciate your generosity to share your ideas. thank you
My Dollar Store sells doilies, not sure if there are similar stores around the world, but if you’re in the USA if you don’t have some that grandma made and don’t want to have to lurk garage sales until you find some, the Dollar Store is the answer. Also their’s are lighter weight, which I think helped with the execution of the project. Showed your project on my blog linking back to you–congrats!
Love it! (If anyone is worried about fire safety, use an LED bulb.)
Love the finished product. So delicate. Good job
[…] few months ago, my sister Rose, posted a very cool link on her blog. The link was for a lace lamp or light fixture. If you look at the link it is gorgeous and her instructions […]
i really liked your idea of this lamp and yours came out beautiful. so i decided to try it. i did everything you directed, yet the balloon didnt pop well and made the fabric cringe. im really sad it didnt turn out they way it suppose to. complete fail for me ):
[…] und somit zu einem schönen Lichtobjekt. Bei design sponge, einen Blog, den ich sehr gerne lese! -“Lace lamp, ein Lampenschirm aus Spitzendeckchen, bei Dos Family, ein Blog, in dem man Einblick die […]
I would use a white string but it looks very pretty anyways!
You should use a cord scrunchie to cover up the red. I think it would be gorgeous!
[…] dosfamily.com via Plink on […]
Love the lamp.Try LEDs-no heat and comes in multiple colors.
Thanks. Yea, LED is good or energy lamps cause they are colder than normal bulbs!
To color it with tea is also a good idea!
Godd luck you all
Hi I just wanted to let everyone that this would work very well with Fabric Stiffener glue. Several years ago I used the Fabric Stiffener on some heart shaped doilies and they turned out very stiff and hard. I attached bunches of silk tulips to them to make wall hangings. They turned out to be quite pretty and I even sold some of them. I am very sure this glue would work with this project especially if parts of it were done and left to dry before doing the other sections. You can find this glue in craft stores. It has been around for many years. I believe it was originally used to stiffen fabric that was draped over dolls so that their clothing was hardened. I guess it was to make them appear more like a figurine. I hope this will help those of you that are having trouble with the ball collapsing. I am very sure this will not happen with this glue because when it dries, it is HARD. Now that I think of the hardness of the doilies in my project, they may be hard to cut to put the bulb in. If it is too hard cut with scissors a pair of wire cutters may have to be used. A round hole may have to be cut and then the round piece attached back on or a round decorative lamp piece put over the hole. I can’t say the balloon will not stick to it as I have not tried it for that purpose. Good Luck Everyone
You can stain the lace with tea to make it look antique. Very pretty.
excellent! thanks!
[…] en Random light-version av ståltråd och en annan av garn, en läcker pappersmuggslampa och så Dosfamilys spetsdukslampa. Hur kreativt som helst och finfina resultat! Blir ni […]
[…] is megtalálható drótlámpa, vagy a Moooi Random lámpa-utánzatának, vagy éppen a hasonló csipkés lámpabúra elkészítésének módját. Íme egy hasonló lámpabúra ötlet – kicsit […]
[…] via Dos Family […]
[…] La nº4 es una maravilla hecha a partir de un globo inflado y unos cuantos encajes. Instrucciones en Dos Family. […]
I think the red cord is on purpose because it gives it a vintage/urban look and it looks fab!!! Don’t hide it.
May I suggest coating the balloon with something like Vaseline before you lay the gluey doileys on it, much easier to get all the balloon off then :)
Hey, Isabelle and Jenny, love this lamp and am going to try it now. Just wanted to let you know that there is more than one site that is using your crochet lamp pic without attributing or backlinking to yours.
Thanks for the great idea! I can’t wait to try this out
[…] since I came across this post, I’ve been wanting to do this project. Months passed by, I moved, got settled and […]
These are fantastic. My problem is getting those round balloons. I have looked everywhere even online. They are hard to find. I wonder if you could use paper doillies too for a cheaper none light version. I need to make some for a wedding so cheaper would be better;) I love this idea.
[…] A beautiful DIY Globe Light – we love the shabby chic take on such modern […]
Help! i tried this but the doilys stuck so hard to the balloon so when the balloon was popped it all crumpled in on itself! What exact glue did you use please and how did you stop the whole thing not loose shape when the balloon was popped!
i want to make lots of these for my wedding and want to get it just right!
many thanks
Im using punch balloons (for kids partys) they are just the right shape and you can make them big or small!
[…] light from The 3 R’s BlogWire orb by Orlando SoriaPaper cup light shade at Cut Out and KeepLace lamp from the Dos FamilyYarn pendant light at Made By […]
I found this post on pinterest! I keep coming back to look at it , I think this might be my next choice for my Copy Cat pinterest Project! You it be ok with you if I liked yours up to my post? I know its a silly question but I always like to check first to make sure
Making this for my place (LOVE IT!) and we used Mod Podge on a Beach Ball, which was hte perfect size…Only problem is that ti isn’t hard enough and all collapsed on itself–what is your glue recipe to make it rock hard?
the lace globe is so—-so incredible and so easy. I have bags of lace to use and because
doilies are so vintage this will just fit in to my vintage home. Love it.
[…] Doilie lampshade – Tutorial from Dos family […]
[…] DIY Lace Pendant Lamp from dosfamily […]
[…] Eftersom Astrid har varit lite krasslig de senaste dagarna har vi försökt hålla oss inomhus (förutom igår då). Det betyder att jag hunnit pysslat en del. Tyvärr är jag inte alls så pysslig som jag skulle vilja vara, men blev ändå rätt nöjd med slutresultatet. Nästa skärm blir ännu bättre. Idéen kom härifrån. […]
LOVE LOVE LOVE the look of this lamp. I inherited many lace doilies, and they have sat unused for years. I’ve now washed,bleached and ironed them and bought a punch balloon (round and large). I’m worried about the glue comments, though. I didn’t see an answer about the glue and how some globes collapsed in on themselves after popping the balloon. Is there a specific glue that has worked well?
Superb idea! Thank you for sharing !
I’ll try to make myself. It looks not hard to make it. But the look is beautiful !!!
What a wonderful idea , cant wait to try it,
I really want to try this project but I too am concerned about it collapsing. What is the glue/ glue mixture you ued to make this work? I have all the Doillies ready to go!
[…] Tutorial […]
LOVE IT! punch balls are at every dollar store here in the states! i buy them for my kids come party time. great idea!
I think I read that she used wall paper paste. :-)
[…] It’s so grandma, yet so cute – it costs you the price of a balloon, wallpaper glue and cloth doilies! More instructions here. […]
I’m so sad! I used punch balloons and white Elmers glue. When I popped the balloon, the whole thing collapsed. Epic fail.superb idea if you can execute it flawlessly.
I am so in love with this lamp. I tried to make one…got tons of doilies, wallpaper paste and a round balloon. I have failed twice, but after looking at the beautiful result I am not ready to give up for good. I “painted” each doily with plenty of wallpaper glue and then placed them strategically onto the balloon to dry. But they would fall off in the night, and they curled up in crazy shapes…any ideas what I may have done wrong, or some tips? Thanks!
Such a lovely light! I have attempted this project twice, too. The first time I used a mixure of Elmer’s glue, water and flour. I found it difficult to get the doilies to stay on the balloon and by the time it dried, the doilies had sagged a bit. When I popped the ballon, the light kept its form. The second time I used wallpaper paste and the doilies stuck to the balloon and the whole thing collapsed. I wasn’t giving up, so I cut a slit in the top and blew up another balloon inside of it. Then, I left the balloon in it while I spray painted it with a clear gloss – it hardened and kept its shape when I popped the balloon. I want to try it again with a different adhesive.
This is AWESOME!! You have just inspired me to make a few projects using the same idea. THANK YOU! Finally, a beautiful modern twist on a beautiful old item. : )
I am gearing up to try this for the first time after reading ALL the comments. I am a little nervous. So, I gathered all the best tips I found from other DIYers and have decided to use a punch-balloon, vaseline on the balloon before I apply the doilies, and I chose to use wallpaper glue. I am so looking forward to this project and moreso the result! I’ll keep you guys posted on my progress!
Can I use mod podge instead of wall paper glue??
I haven’t tried this yet but cannot wait to. I wonder if lightly spraying the balloon with cooking spray would work? How about useing liquid starch? Not sure if it would be stiff enough, but again…just a thought.
I tried to make one of these today but my doilies kept sliding off the balloon and each other. I settled on making one half and have left it to dry then will see if I can add to it tomorrow after it’s dry.
Hi you all!
Now I updated this post with some problemshooting tips or ideas. I hope it helps!
Isabelle
I made mine last week. I used premixed wallpaper paste – Zinsser suregrip from the hardware store. I used a Punchbag balloon which inflates to 16 inches. The first one I got at Party City had Thomas the Tank Engine on it. I inflated it to the max, and it popped. The second one I got, I only inflated to 13-14 inches. I applied the glue very generously. One doily was heavier, so it had to stay on top while it dried. I let it dry for about 36 hours. Before popping it, I slipped my finger(s) through where I could to separate the doilies from the balloon. It was then o noticed that some were dry on the outside but not on the inside, so I let it dry longer. I think slightly underinflating makes the balloon more flexible and allowed me to push it down and away from the dry doilies more easily. When I popped it, it was fine! One more thing – because it was heavy, it pulled down on the balloon, making it not exactly round. So then I tied the punch handle to another string, so all the weight wasn’t being held by the one strong on top. I’m now waiting for my light fixture kit to arrive in the mail! Thanks Isobel for the great idea!
this really a innovative lamp shade .looking so cute i will try it soon
1st time here i have indian food blog do visit my site
I think that white led christmas lights would be beautiful in it. This of course would be for a more muted light. Or maybe blue lights. Possibilities are endless.
[…] Lace Lamp – wow. I absolutely love this DIY, it looks so pretty, yet it seems so simple to make! It is […]
[…] Hanging Linens, Necklace, Closet, White Top, Bedding, Black Top, Cake, Black Turtleneck, Pillow, Lantern, Doilies, Cushion, Cans, HandBag, Change Purses, Bed 1, Bed 2, Bed 3. In […]
Hi Isabelle,
My friend and I are planning on making these next weekend. I am looking into buying vintage doilies, and I was wondering how many you typically use and what size?
Thanks,
Grace
Thank you so much for posting this! I just had success!!! Sooo pleased with the result. I used Wallpaper powder and a third flower to try to keep it from tacking to the balloon. I soaked each piece front and back in the paste to give it more strength. I then waited 2 days for it to dry. With the weather here being below zero right now I took it out side and the balloon shrunk naturally and pulled itself away gradually. I then waited another day then untied the balloon and slowly let air out while pushing the sides in between the wholes to separate the 2. Now I’m left with a beautiful doily shell ready for a lighting fixture. I really do credit the cold weather for helping to separate the balloon. Also my advise with the wallpaper paste is to be patient at first I was discouraged and afraid it would not dry stiff. after leaving it over night i was pleasantly surprised so be patient and it will all hopefully work out for you. The result is beautiful!!!
I made a similar lamp before with string and Elmer’s glue only, but it can not be deluded. There was one thing that I didn’t do that would have made the job easier and that was to use petroleum jelly to coat the entire balloon so the stiffener would not tack to the balloon. I found that if I worked in the bathroom and hung the balloon up in the bathtub tied with a long string to an adjustable shower curtain rod placed at a comfortable working height in the front of the bathtub, this gave me an easier area to clean and work from. I moved the rod closer to the outside of the tub to work, moved it to the middle of the tub to dry. I took it out to use the shower for bathing. It made clean up easy, I rinsed the stiffener out of the tub, it was made from a water soluble substance. I used a long piece of thread around the top of the balloon and pulled the balloon toward me to work with, slide it away to dry. Placing it in the bathroom left the project undisturbed by birds, squirrels and curious big and little hands of people. I will do your project next time with the doilies and Jiffy fabric stiffener. One more thing that made it easier, I put everything in a plastic bags and coated the string with the glue, doilies should be easier to coat with a stiffener.
Me ha encantado, la intentaré hacer. Muchas gracias.
Me ha gustado, la intentare hacer. Gracias.
[…] Lace Lamp – Dos Family […]
Thank you so much for this awesome tutorial! A friend of mine was really excited to make these, she has tons of old doilies that her great grandmother had given her before she died and she wanted to make a lamp for her mother. I figured it would be best to test the project with thrift doilies and make sure we knew how to do it correctly before potentially ruining her special ones.
First, I could not find any fairly inexpensive wallpaper glue, so after searching store after store, I decided to go to my local craft store and got MOD PODGE. They have it in sparkles and glitter to which is just fantastic! I also bought some spray fabric stiffener for good measure. It took about 1 & 1/2 larger jars of the Mod Podge to thoroughly soak the doilies and cover a punch ball. I then sprayed a bunch of the fabric hardener all over the surface and let it dry.
I waited a day, then added one more coat to my work just to be careful. After letting that dry we decided to go ahead and pop it. The sound was something almost scary & we thought it was going to cave in but worked great, it was super easy getting the balloon out too.
Also, if you can find the thicker doilies they are strong when it comes off the balloon. I love my new lamp! Thanks again!
Oh this was/is such a great project and thanks so much for the idea. I am a wedding planner and also I have a daughter getting married next summer in a farm setting with a barn reception. I have a very creative mind, but not a pro at crafts. With that being said….I am making about 30 of these to hang with pendant lights for my daughter’s reception. I started a week ago on my first one – the balloon was too egg shaped so I had to go on the hunt for “round” balloons. While the first one came out beautifully, I wasn’t happy with the shape. The truly round balloons are rather tough to find, but I finally did. I since then pulled apart my first one, soaked all the hardened doilies in laundry detergent and water, let dry – and poof – they are good to go for another doily pendant with the balloon shape that I want. I actually purchased cheap plastic throw away bowls (smaller than the balloon of course) and use them as a pedestal or stand to place the balloon on as I work. I have an assembly line going of drying doily balloons. I also have a ceiling fan in the room where I am working and turn it up to expedite the drying process. I have had extreme success with Stiffy – fabric stiffener. I pour it in an aluminum tray and lay the doily in it. I actually saturate the doily fairly well and squeeze out the excess. I then stretch the doily firmly and flat over the balloon. I found that it was easier to do half of the balloon as the doilies will slide off or lift if gravity is not holding the doily down. You definitely want to keep all edges down firmly. I do overlap the doilies. When they are all dry – I simply hold the knot of the balloon and snip a hole and let the air out gently – you can hear the balloon peel away for the doilies. I have gone out on a wild hunt for vintage doilies, antique stores, etc. While I certainly could go purchase new ones, they won’t have the history behind them or the uniqueness. I am mixing white, ivory, ecru on each pendant as I want them for sure have the vintage eclectic feel. I finished 12 this week and only have 18 to go. Each one is so beautiful and unique to itself. I have found that it takes 3/4 of a 16 oz. bottle of Stiffy to create one 14″ pendant. I do saturate the doilies a lot so as to ensure a really stiff result. Also, I am making two different size pendants. All in all, I am thrilled and my daughter just loves them. Thank you, thank you!
I wonder if a base of some type of net or tulle might provide a better foundation if there is a problem for some. It is cheap enough and provide a substrate between the doilies and the balloon.
Does it have to be round? Nope.
A mixture of sizes of doilies will fill up the spaces with nothing but one size.
There are also spray paints just for fabrics and I wonder what other touch that might add to a created lamp. How about adding small pieces of quaint fabrics? Or lace trimmings besides the doilies?
How about mounting one of the lampshades on a floor lamp? Like the torchiere types? Make it look something like a streetlamp with a doily shade. Gads….I know where my shade will go when it is done. That ugly lamp with no good shade will turn into something very special.
I don’t see why planning ahead can plan where to put the bulb fixture part can make the goal easier to reach. A variation on the doily idea can be made into almost any shape for any use. Think chandelier with a wide open space at the bottom…maybe only half of the round object to make it.
NUTS!! a lot of ideas, little time, no money.
[…] a doily lamp or doily […]
[…] I just stumbled across an amazing DIY Doiley lamp on Pinterest which I thought I would share with you all! It is almost the 1st of December , so almost time to decorate and put up the Christmas tree!! This beautiful lamp is easy, inexpensive and is truly amazing to look at! Instructions via the dosfamily.com blog. […]
Gracias por compartir la lámpara tejida en crochet, Es muy buena idea.
All these posts and ideas are super! Since it’s winter in Florida, it’s a good time to try this. While reading I wondered if using a PAM type spray instead of Vaseline would be as good and keep the grease content down? Just a quick spray. Also, while reading I thought…color…or a clear coat or variety of colors…the ideas on this seem so endless!
While I’ve seen something similar to this elsewhere, the comments and ideas here pass them by. And the Swedes…they are so innovative!! (me being Swedish too!)
Happy season everyone!
I am looking forward to trying this. I think I will try the Mod Podge and some ironing starch for the doilies, should I find some nice ones. I only have one doily right now and it was made by a little old lady before she died. about 16″ across, and pretty holey. We have a Hobby Lobby here, so that is where I will go to look. I am excited about the idea of trying this.
The only thing I am unfamiliar with is the light kit. Where do you find something like that?
Isabelle: In sweden pretty much everywhere. Interior decoration stores/hardware stores etc good luck
[…] de Pom-Pons – Bola/Lustre de Renda More Liraby:Kizli Lynn – Part 2Gypsy It’s Raining RedRelated Posts This entry was posted in diy […]
Encantadora esta lampara, me inspiro mucho veremos como puedo ponerla en marcha, cariños
[…] Dos Family Doily Lamp […]
[…] photos : Dos Family Vous avez chiné de vieux napperons et de vielles dentelles sur une brocante? Vous en avez hérité […]
Just love your idea, will be trying this one!
[…] craftswoman Isabelle Dos started with a simple party-shop balloon, blown up big and wrapped in white lace place settings […]
I just did this project with success, couple added notes to address some problems.
1) cover the balloon with Vaseline before putting the dollies on, it helps make it stick and when you go to pop it, it won’t collapse.
2) once the dollies are dry and balloon is popped, use clear acrylic spray paint. Spray a couple layers over the shade and it’ll make it much harder and durable. Make sure the can says non-yellowing effect so it doesn’t change the color.
3) lastly, find a metal wire ring (i had thick wire and a special tool to get a perfect circle, but you might be able to find one at a hardware store or from a choker necklace). then use thin jewelry to attach the ring to the inside of the shade. then loop string through the ring and bring it out of the hole to hang it. This ensures that the shade won’t bend or change shapes while it hangs.
[…] Le tutoriel est disponible sur le très beau blog Dos Family […]
[…] Here is a clever and good value idea from a Swedish craftswoman Isabella Dos – a DIY doiley lampshade. You get get full details on how to do it on Isabella’s website […]
[…] craftswoman Isabelle Dos started with a simple party-shop balloon, blown up big and wrapped in white lace place settings […]
You could use a little flour and hot water. Boil some water add the flour where it’s kind of runny but still a little thick. That’s what they use to make some piñatas. It’s might work. You could try it buy it self or the glue then the mix.
[…] dosfamily.com via Rebekah on […]
This is looks great, my only question is about the flammable possibilities of this if it were left on for a long period of time, will that be an issue?
Hi Gina Howald I am ready to make tons of these for my daughter s wedding reception as well…..I like all your ideas and instructions ….our wedding will be in February if you are living in Utah or Arizona and you are interested To selling them I love to contact you :)
[…] It is getting closer to Christmas & I am sooo excited! I keep finding these fun DIY creations & cannot wait to do them over the break w/family. I have always wanted to try the doily lamp b/c they are just too pretty & super easy to make. Take a peek at the full tutorial by DOS Family here. […]
[…] you are a doily lover too check out this blog for a lovely Lace lamp/Doily Lamp – DIY you can make one with your […]
Love this Lace lamp – stunning! Have shared your link on our blog.
[…] (images vía: dos family) […]
I saw something similar to this and they suggested rubbing a light sheen layer of Vasoline on the balloon so when popped it would not stick to the balloon. Maybe this is something to try out.
it’s amazing!!! i love this lamp!
That is a genious idea. It is so beautiful and elegant. With such a homey touch!
Your photos are beautiful … the lighting, to me, was just right. What a wonderful idea. Thank you!
Love this idea! Im making it as a Christmas gift! You said that you might try wood glue after the lace stiffens. Would you apply that with the balloon still inflated?
Isabelle: Now when it’s all dry and the balloon is out. Mix a bit of water with wood glue and use a hairdryer to stiffen. Apply light. (I havnt tested this on the doilies but with other stuff.)
THis is amazing! Found you thanks to a Russian blog :)
[…] DOS Family via More Design […]
[…] lamp’ …Put those old doilies that you inherited from your grandmother to good use! Hit up here for easy diy […]
Very nice lamp. :-) I think you are right that some people may have had issues because of how different the glues may be in different countries. I’m in the United States and I can tell you that glue here is lots less sticky that glue in Europe. I spent several years in Germany and once I got back to the States, I found it disappointing to not be able to find what I termed decent products for my crafts. I’d gotten used to the products in Germany. It is hard to find glues that stick as well as those I could get in Germany. :-)
I’ve wanted to make one of those lamps for a long time now. Yours are the best directions for making one that I’ve come across yet.:-)
Have you ever tried to make one for a standing lamp at all? What are your thoughts on that? (I ask because I live in an apartment and I have a tall standing lamp that would be perfect to convert.)
And you know, come to think of it, I’m betting one could actually duplicate a Death Star looking lamp shade….Oh, boy, my husband would kill me if I Star Wars bombed our living room like that! *LOL*
ME
I think your lamp is amazing! I am definitely going to try making one! I have a lamp fixture in our vintage 60’s home that has three balls… this would be perfect to have three doily lamp balls instead, how beautiful it would be! And the perfect accessory for a crochet designer’s home, yes? Thank you so much for sharing your beautiful project!
[…] from Dos Family, More Design Please & Pinterest* spread the love:EmailLike this:LikeOne blogger likes this […]
[…] some doilies from our grandmothers but we didn’t know what to do with them. Here is a great idea: Turn them into a lamp using just some wallpaper glue and a balloon. […]
This would make a different but very romantic lighting option for a wedding reception!
I’ve used Stiffy fabric stiffener on ribbon projects in the past and it is an awesome product. I think it would work really well for this project too.
I don’t know if this would work. My mother did a lot of craft projects when I was growing up, I remember her using starch for something like this, just a thought… Lovely lamp!
This is ab-sa-loooo-ly FABULOUS! I am so going to make one for my loft conversion.. <3 it!! :)
My daughter was just engaged at Christmas time, and has already bought a beautiful lace wedding dress; I think I will try this for decorations at her wedding reception… would be beautiful. Its kind of vintage-looking.
Hi, I just love the lamp you made. I’m going to make one for my daughter’s bedroom.One thing I want to share is that you can use cornflour paste to stiffen up the lamp . Just coat it with a brush over the glue when it dries (without popping the baloon), and let it dry completely before popping the baloon. Take care not to make the cornflour(or corn starch) paste too thick or it will form clumps between the lace pattern.
I’m wondering how modge podge would work for this project. hmmm may try it.
I made this and it turned out perfect! I used wallpaper glue, left it for 24 hours, covered the whole thing in watered down wood glue and left for another 24 hours.
[…] un peu j’ai vu que des gens avaient déjà eu la même idée et ça donne des trucs super, genre ça ou ça. Bref je dois encore étoffer ma collec’ de napperons vintage pour la faire (vu que […]
We have an outdoor wedding coming up, this will be perfect hanging from the trees! Thanks
What do you think about mod podge ,I think I’m going to try it ,I’ll let you know if it worked.
I was thinking like Kim and try modge podge and paper doilys. harder to find lace ones near me.
Speaking from a guys stand point I found a large washer at the hardware store that works as a fastening point for the pendant light I bought. This will be placed on top of the balloon through the balloon opening then when the project is done, it is easier to screw on the pendant instead of the light shade dangling on the wire. Though this would fix the light position more towards the top than in the middle.
Just thinking out loud. When I’m done I can snap some pics to post if anyone wants to see. Great idea for a DIY!!
Isabelle: Great thinking – please send the images to isabelle(at)dosfamily.com!
It looks really pretty. I imaging doing it with black lace! Or gold spray it would look nice too – but the right one so it will not be soft again.
Love it when someone finds a pretty use for collections of lace, fabrics, ribbons and doillies!! I will be ‘tea staining’ my lace first with rosehip tea for a pinkish tinge.xx
This is absolutely gorgeous! I’ve to go hunt down some dollies now!
I absolutely love these! I had 2 hanging lamps in my living room that had different shades that I had made. I tea stained doilies that I got from a flea market & used wallpaper paste and balloons purchased at a party store. After looking at several posts, I did use watered down wood glue to cover the doilies after I popped the balloon. My new lamps look beautiful! Thanks so much for this great idea.
My mom made Easter Eggs & Silk flower containers using string. She used many coats of liquid starch and they were very strong, and looked beautiful. And popped the baloon when it had hardened, then she could cut an opening with an exacto knife. But with the doilies these ar so much prettier and I love the idea of the lamp.
[…] picure found on DOS family that startled my […]
Should I use a specific kind of fabric or is cotton best. When you say use a cold bulb do you mean one of the new low wattage ones that are money savers? Just wanted to say, I am going to try this. I am always into crafts. It looks great. Have you heard of Gorilla Glue? It is supposed to hold anything.? Beatrice
Hi Beatrice,
Gorilla Glue is an XLNT idea. However, only use it after the doily lamp is free from the balloon. Gorilla Glue is permanent and will glue the doilies to the balloon. It would take dynamite to free the doilies.
Happy Crafting!
I just finished making one of these but some of the problems that I got were that I ran out of doileys. You need a lot. Also that u can’t stick thick doileys on there. Because I ran out I had to rummage around the house looking for one and the only one I could find was square and really thick, so I cut it to fit and stuck it on. But because it was so thick it wouldnt stay on the boom of the balloon when it was hung. So I had to sit it on its side and now I juts woke up and checked it and one of the doileys has all bubbled and gone hard. But apart from that I will defiantly be giving at another go and hopefully it will work this time :) thank a lot, great project to do
Try pretty ribbons in several widths, colors, designs. Will look great. Also use different shaped balloons.
Mabe try Mod Podge? or Dip n Drape?
I just got done working on my lamp, I hope it works out! I had a heck of a time with the bottom piece, it wont stay on. I am going to let it dry then flip it over and do the bottom. Thank you for the beautiful idea!
I Live Design for you
This is just so sweet. I’m thinking to use this for a babyroom
[…] y fotos: Dos Family. {lang: ‘pt-PT’} Tweet Tags: DIY, eco friendly, ecológico, green, lámpara, proyecto, […]
how do you change the light bulb
Good question, no one seems to have thought about that, i did;nt. Duu
[…] Dos Family Seriously, ideas? I can’t figure out where to get enough of them. Pin itRelated […]
[…] complete instructions visit :http://dosfamily.com/2011/01/lace-lamp/ This entry was posted in DIY, Just Because We Love it…. Bookmark the permalink. ← A […]
would modge podge work instead?
will modge podge work?
[…] Dos Family Seriously, ideas? I can’t figure out where to get enough of them. Pin itRelated […]
these are making a come back…we made them in the sixties…also, made a smaller one that goes inside the larger one thanks for all your wonderful ideas and for sharing them!
Wish you had a Pinterest pin for me to remember this great idea by – good job anyways! PS Hej fra Danmark : )
[…] Click here to see more and learn how to make your own doily lamps on Dos Family. […]
[…] dosfamily.com via {darlene} on […]
I used modge podge for this, DEFINITELY DOESN’T WORK, DO NOT TRY MODGE PODGE! I probably should have just followed the directions in the first place since I had not tired this yet, but I’d used modge podge for other projects and had some on hand so I thought “why wouldn’t it work, it does the same thing?” But once the balloon popped it started bring the lace doilies with it as it deflated because they were not hard but more of a limp mass. It was easy to get the balloon out but once I did it just kind of became a soft version of the lamp and not usable. So I’m gunna try to throw it into the washer machine and retry it with some wall paper glue like instructed! Otherwise I might have to just tear them all apart to redo? Anyways, thought I’d just throw my experience out there since people had asked about it.
Wish I had read that before! Already got my first coat on. Do I peel and start all of with wood glue, or apply wood glue on top? What eventually worked for you?
Al it worked for me from the beginning. Otherwise apply wood glue on top! when it’s dry
Just sooo beautiful! Perfect for a little girl’s (baby’s) room!!!
[…] fixtures in black and white for around$6.00) you can create your very own beautiful fixture! Click here for instructions! Share this:TwitterFacebookLike this:LikeBe the first to like this […]
I was just thinking how fun this might be to use small water balloons and small doilies, then put them along a string of small lights like we use at Christmas. Those come in many different colors and would be a great addition to a patio BBQ setting!
[…] Here is a clever and good value idea from a Swedish craftswoman Isabelle Dos – a DIY doiley lampshade. You get get full details on how to do it on Isabelle’s website […]
Isabelle….First off, let me say…your lamp is absolutly BEAUTIFUL!
These would be so pretty made in a variety of sizes and hung at different levels from ribbons from the ceiling for a party or wedding reception , with or without lights in them….and if being used purely for decoration that will be tossed later, why not try to make them with paper doilies, so they would be pretty cheap? Fake pearls/flowers and ribbons could be glued for extra charm also.
I used to use Dip & Drape on dolls that I made YEARS ago…I can`t believe it would`nt work if your wallpaper paste does`nt. Also think starch would probably work.
I`m certainly going to try some of these…..so, SO pretty!!!!
Thanks Linda – there are lots of things you an do with it! For me the wallpaper glue works just fine but I can see that many more had difficulties.
The Plaid company (in the US) makes a product called Stiffy, which is specifically a fabric stiffener. I haven’t tried it yet, but I would guess it works better than Mod Podge because it is formulated for stiffening draped fabric. Other companies make fabric stiffener products, too. Worth a try. Love the lamp!
Do you know if this would work with paper doilies?
[…] dosfamily.com via oy on […]
[…] 2. Koronkowy abażur od Dos Family. […]
[…] créatrice de ce tuto – dosfamily.com – considère que le produit est fini à ce moment-là. Néanmoins, même si elle ne l’a jamais […]
[…] Dos Family: http://dosfamily.com/2011/01/lace-lamp/ Share this:TwitterFacebookLike this:LikeBe the first to like this […]
Gorgeous!
So Crafty So Cute I will try and let you know how it turns out
[…] Tu cherches une idée pour illuminer de façon originale ta chambre ou ton salon, Isabelle de Dos Family te propose d’utiliser des vieux centres de table en crochet pour les métamorphoser en une superbe lampe suspendue. […]
I think this is a great take on paper-mache’ and using it for a household purpose makes it just that much more fun! My daughter-in-law is wanting to make one this weekend and I hope that I will get to see it done! As for using it for my stand-up lamp, I think that I will use some medium to heavier grade doilies and do a double coating of glue once it has initially dried.
I want to use it as an upside-down shade, so I won’t cover the whole balloon–leaving the bottom open and cutting the doily “top” to fit my lamp base before I dip it in glue and place it on the balloon.
Maybe… I will dye the doilies first before I begin, so that my shade is colored from the git-go! Thanks for all the wonderful ideas that this one picture has sparked! :D I am off and running now!
It’s a very good idea. I think I must try it. Thank you .
HSK
[…] courtesy of More Design Please. Check out the full DIY at Dos Family. Posted on February 17, 2012 by Refreshbug. This entry was posted in Do it yourself. Bookmark […]
how do you change the bulb once it burns out?
Isabelle: I simply untie the knots I made on the top but since it is a LED it kind of burns forever.
[…] credits: Nina Ricca; GingerpDesigns, etsy; diy lace lamps via Dos Family; LoLo Event Design shot by Joe Wallace; Marchesa via […]
I used mod podge, but it left plasticy skin between the strands in the doilies. Maybe I put it on too thick, but it the stiffness when dried seemed perfect (it was flexible but still retained the shape). So I bet wallpaper paste is the best option. I have also used the corn starch method for these things in the past, but wouldn’t recommend it for a project like this.
That is so pretty. It is a wonderful and unique touch to a room. I think I might try something similar with my kids some day. What a great idea. Thanks for sharing.
: 0 ) Theresa
What a good idea. I like to work with crochet, so I can try is that way.
Great!
Love this idea! Would it be possible to use paper doillies instead?
Isabelle: I haven’t tried but I don’t see why not. It more difficult to shape them and they tear more easily but with smaller ones?
What a good idea!… I’ll knit my own little crochet carpets to make my lamp!… :o)
Isabelle: Great- send me your pictures when it’s done!
[…] One crafter came up with this idea to use paper mache techniques to plaster old lace onto a balloon. After left one night to dry the balloon is popped and a bulb and cord are inserted. For more details on how to make this lace lamp yourself, visit the Dos Family Blog. […]
This is so pretty. I can’t wait to make them and give them to some very special people in my life. Thanks so much for sharing such a great idea.
I live in the U.S., and over here, using wallpaper glue was the absolute worst thing to use. There was only the one brand at Wal-Mart called Zinsser DIF. It doesn’t stick, and it doesn’t dry! In fact, the next day I saw there was a small puddle of glue on the floor, and I was scared it would ruin the carpet, but it was still wet as if I just opened the can and poured it on the floor. The balloon is still soaking wet, and it’s been 3 days! I then made the mistake of pouring wood glue over the same balloon/fabric, instead of trying it on a new one, so I don’t think it will work at all. I am now trying wood glue on a new balloon. I was advised by a friend who is an art major to try to pour the wood glue all over the balloon (before using any fabric), and let it dry. Repeat with 7 or 8 layers. This helps the shape to stay when the balloon is popped. Then after all the layers, put glue on the fabric and then put the fabric on the balloon. I will try that out! I could have bought a new lamp with the amount of money I spent on materials for this lamp!
Hi and thank you so much for sharing this,It is just adorable and will be trying it today.I love anything i can do with old linens and dollies.All your extra tips will help i am sure.I bet it is just lovely in Sweden. enjoy your crafting as i know i sure do
[…] Ver proceso de la lámpara […]
[…] And finally, another DIY – a lace lightshade from Dos Family: […]
[…] I don’t decorate in this style, I absolutely loooove this DIY. The instructions can be found here. Make sure to scroll down and read all the add’l tips as it seems this DIY has been a little […]
[…] instructions for this are a little more complex, so head on over here to view the tutorial. Share this:TwitterFacebookLike this:LikeBe the first to like this post. […]
I think regular elmers glue would b o.k. for this project. I’ve seen where kids just use string and wrap the balloon. The doilies look so elegant. Love your idea!
What a good idea, love it love it. I think on a smaller scale they would look lovely as Christmas decorations.
Thanks
Wow.. Very beautiful… Thx for sharing this.. Love it..
[…] I feel like I should do something to redeem doilies because they really can be beautiful. To convince you, I want you to consider this lamp shade Isabelle made and featured on her blog Dos Family. […]
I like
How do you get the balloon peices out after you pop it?
[…] Source: More Design Please & Dos Family […]
You can use “tacky glue ” which is the same as regular white glue.
[…] gorgeous DIY lace lamp from Dos Family is surprisingly easy to make! Start with a large party balloon and blow it up to whatever size […]
ITS AMAZING!!!
I wonder if liquid starch would work? I didn’t read all of the comments so forgive me if I am duplicating.
I tried this and had mixed results. My biggest problem was with getting the doilies to lie flat – even did it in shifts, first the top half then flipped upside down and did the bottom. They aren’t nice and smooth like yours, but I still like it. I actually took round doilies and cut the centers and stitched around brass rings for the top and bottom openings (that part I do like the way that turned out). I may try again.
What size balloon did you use? I used a large balloon, like 20″ in diameter. Maybe I am trying too large of a size?
Oh and I started with fabric stiffener but ended up using Elmer’s glue. Seemed to work about the same.
where can i find balloons like this that are perfectly round and spherical? most balloons in the U.S. are oval and oblong…
@cricket I just did a search and found some perfectly round balloons on Amazon:
http://www.amazon.com/Standard-White-3-Latex-Balloon/dp/B001IWLWC4/ref=sr_1_2?ie=UTF8&qid=1331850012&sr=8-2
My children use to do something similar to this with Different colored threads and a sugar-water
mixture. They used small round ballons though and when it was completely dry we would pop
balloons and the thread balls were used as Christmas tree ornaments. They were very cute, colorful and easy to make and they lasted a long time.
Hi, I would like to know what kind of glue do you use?
A very neat thing! Thanks for sharing. I used to make home made paper mache’ paste with flour, water and salt.
I made our sons piggy banks and Easter bunnies by blowing up balloons and adding the various elements: ears snouts legs etc… and all with the paper mache’ paste I’d made. These dried really well and hard and stiff.
Painted them after completely dry and they lasted for years!
I can’t imagine why it wouldn’t work for these. Maybe I’ll try it and see.
I pinned this on Pintrest 14 minutes ago and it’s already been repinned 25 times. It’s such a great idea!!
For those in the US having trouble finding strong round balloons – try the punching ball balloons, you can find them with the party supplies.
Hi,
In the UK you can use ‘stiffy’ its a fabric hardener. Works a treat. Also get the punch balloons. I have also use starch which has mixed success dependent on weather
Isabelle: great thanks for your input!
i tried this and at first i used wall paper glue from Lowe’s that came in a tub. I used one whole tub and did multiple layers… each time i popped the balloon the doily sphere would collapse on itself. I had given up all hope trying numerous elements to stiffen it until I went to Joann fabrics and got fabric stiffener glue. I coated the doily sphere once and the next day popped the balloon and to my surprise, it didn’t collapse on itself! I believe that the many coats of wall paper glue helped create a sturdy base for the fabric stiffener to work out so well!
I doubt that the wood glue will do much for you. The only difference in wood glue and white glue is that wood glue has a stearate added to it so that it will not gum up your sand paper when sanding. Depending on the manufacturer, it might also have a bit of coloring in it to distinguish it from white glue.
I have done similar projects draping cheese cloth over balloons to make halloween ghosts. I have made them with heave starch as well as sugar. I’ll try the wall paper glue next, but it seems that it would need more coats if using the premixed kind.
Not sure you’d want to use an LED in the united states.. many of our LEDs have a metal component near the base of the bulb that DOES get hot.
I love this! I am thinking about trying with ModPodge and fabric stiffener.
[…] I don’t know why.I simply lay them on top of the balloon then made sure the doilies overlapped eachother. Lace lamp/Doiliy Lamp – DIY | DosFamily […]
Hi,
I think this is a wonderful party idea. I would like to try it, but I was wondering if you thought using paper dollies would still work, instead of the lace.
Thank you
[…] Center right: Lace doily lamps | Dos Family […]
I bet a nice coat of starch would work well after the doily dries. I’ll try this soon. Thanks for the idea!
[…] Anyway it’s great cause I have the time and space to do lots of DIY projects. Starting with this lamp. (Dalarna is in th middle/north of Sweden. To me and Jenny it’s north but Sweden is a very tall country so I guess we are not even in the middle). (It is so dark here at the moment – cant get the photos so crisp that I like). Lace lamp/Doiliy Lamp – DIY | DosFamily […]
Isabelle, it is so very kind, generous and patient of you to take the time to share the photos, and then the how-tos, and furthermore, the “why nots” of this lamp! i’m always amazed at the time it takes to make a project, then to try to explain it – and you’ve done a beautiful job. what a lovely life you live – and live well. take care – thank you – nina
Thank you Nina – such sweet words! xx Isabelle
[…] 6. The Bulb. Lace lamp/Doiliy Lamp – DIY | DosFamily […]
[…] avais présenté ici. Si vous êtes experte en crochet tant mieux mais le tuto que nous présente Dos family est totalement à la portée des enfants. Un ballon de baudruche, de la colle, des napperons […]
I love that. I wonder how it would look in different colors? I will try that some day. I have so many other projects going on. But I will do it someday. And I will let you know how it turned out.
Hi, i was just wondering how bright is it when you put the light in it? is it really dull or is it fairly bright. In otherwords, would it light up a room!?
Thanks!!
This lamp is amazing, poetic, romantic, simple and smart, I just love it, congrats!
I am moving into a cottage and have made many doilies… i am so excited to try this and use my own doilies for a lamp in my bedroom. My daughter-in-law saw this and thought of me. Thank you.. Great idea and all the remarks.. love it..
Hi, Thanks for your project,my daughter asked me to make for her. I found wood glue put on each doily and applied to a blow up beach ball worked best for me.lmade a ring with fabric covered wire to enable globe to go in. I was very happy and all was ok until we had a very hot week, with very high temperatures. I then found the lamp had distorted as if the glue melted. I can moisten and insert ball again, but would like to try a more permanent way of stiffening, i found same lace doileys made into trays in a store and they appear to be stiffened with a plastic any ideas on what would have been used. anyhow thank you again. Joy
I was wondering if paper doilies will work as well.
Has anyone tried using Mod-Podge for this? It’s been a while since I’ve done any crafting so I don’t know how it would compare but I seem to recall it dries pretty solidly (?) Thoughts?
[…] a chic and timeless decoration for your home! To see the tutorial on how to make this doily lamp, CLICK HERE.Note: we would suggest using an LED light instead of a regular light […]
I’m wondering if a punching ball (a balloon on a rubber band would work). They are bigger and stronger but when popped would be easy to remove. Just an idea.
I have done similar crafts using liquid starch. Just soak the doily in the liquid starch…must buy liquid starch in a bottle; cannot mix powdered starch and water–not the same. The liquid starch dries rather stiff and holds up well.
I think in the US, the best thing to try might be decorate medium or plain old Elmers glue.
you can buy hardening spray at any craft store or local department store. After the balloon is popped and it is dry, spray well and let it dry. Should be fine after that. Good Luck!
Pretty
Kiss
So beautiful!
Made mine and it was perfect, wallpaper glue took 2-3 days to dry.
Can’t wait to hang it and switch on the light.
Thank you
Romi – Cape Town – South Africa :)
Hi which glue did you use and did the lace hold up after the balloon was deflated? I’m also from SA (Cape Town too!) and am wanting to make these for my wedding and want them to work lol
Can you email me pics perhaps? tails at internot dotcodotza
I wanted to say a great big thank you for the awesome tutorial. I have made a lightshade for my daughters room and she loves it. I also get comments from everyone who sees it.
Thanks again!
I cant wait to try this! Another similar project used regular bouncy balls of different sizes, then just deflated them with a needle inflator. They also used tacky glue.
que buena idea
I have been making these for my daughters wedding, the punch bag balloon is nice and big as I want them big for an outdoors wedding tent. I have found out for those that might be having a problem you might be tempted to buy old lace looking curtain or table clothes which is fine but they have to have more of a cotton feel to them, some seem to be more plastic fake feel to them and those will not work. The more cotton the better in the thread! I also found that dollies are a little heavier and will produce a firmer lantern. Hope this help someone!
Maybe liquid starch would be a good alternative for the glue. ??
adorei, linda a luminária de crochê
Sou do Brasil, São Paulo.
Kisses
[…] but you can reuse them to give your lamp shade a more homey, but still contemporary, feel. See the tutorial here on Dos Family’s […]
Why not use fabric stifener instead of wallpaper glue?
[…] our first DIY project, we’re sharing with you how to make lace lanterns. We originally saw this DIY project on Pinterest that used actual lace doilies. We wanted to come up with a […]
I can tell you that wallpaper glue does NOT work in the USA. I used 2 different kinds and 3 coats of it and let it sit for 4 days after I slowly deflated the balloon the doilies went with it. I reinflated balloons and am applying wood glue in sections and letting dry. Fingers crossed this will work
Awesome lamp
[…] I’ll begin with a project I finished recently: the doily lampshade. After reading this post on the DOS Family blog I immediately became over-excited at the idea of making my own lovely lacy lampshade. After a […]
I love this tutorial! I recently finished my lampshade and have posted about it on my blog. All my visitors are impressed with my shade and want to make their own. So thank you, so much!
EMily, Are you here in the U.S? Melissa says wallpaper glue in the U.S doesnt work, so I was wondering what you used ( if you are from here,) or if anyone has any suggestions for me!I cant wait to make this!
[…] out of wood glue for my lace ceiling decor. To the left is me, Mom and my sister trying to make that project work late one night – with really bad hair all […]
Can you send me an email and tell me how many lace tablecloths you used?
Thanks!
Has anyone ever tried spraying them with a starch to keep them hard? We used pre-mixed wallpaper paste and when we popped the balloons (after dry) they sucked the doilies in and they ended up in weird shapes. I did blow up new balloons and tried a coat of fabric stiffener on one and a second coat of wallpaper paste on a different one & finally, a thinned down coat of the fabric stiffener on a third one. The fabric stiffener worked well to keep them hard, but it filled in the wholes of the lace and therefore changed the look…..not so lacey now. The fabric stiffener did the same and filled in the lace wholes. The thinned down fabric stiffener worked a little better, but it was random in that it left some holes as holes and filled in others.
I’m also wondering about a spray fabric stiffener such as aileen’s. I don’t know if it will fill in the holes or not, but if anyone has tried this or a starch and had success, it would be great if you posted it. OR, if you’ve had success using a specific paste here in the states, please pass it along. We made 15 for my daughters wedding and really want to try and fix the problem as we love this project. It is so pretty. Plus, we are all swedes, so we want to have it at the wedding since it came from a Svenska flicka!
Thanks!
Doing these also for my daughters Wedding have around 30 made. Like you say they need to be harder they seem to keep there shape in cooler weather but if it’s hot and humid they collapse. I have tried spray painting them to liquid starch, spray varnish to fabric stiffeners, but the fabric stiffener I can find around here is not for humidity there is a difference. Plus it is so expensive to do. I think we have decided if it is humid on the day of the Wedding we are blowing up white or clear balloons back in them and put a led light into the balloon before hanging. The LED light is just the bulb with a flat battery between the wires and taped down.
Have you tried the wood glue yet? Wood glue tends to dry yellowish. Maybe for a bit more stiffness, you could try clear epoxy but that will make it stick more to the balloon, so maybe try the epoxy after the balloon is removed?? Just a thought. I haven’t tried it out yet but I really like this.
Als behangerslijm niet goed werkt kan je beter textielverharder gebruiken zoals paverpol kan je ook in alle kleuren maken of verven met acrielverf
Brilliant.
Has anyone trued modpodge?
[…] : dosfamily ch_client = "rbdhewa"; ch_width = 550; ch_height = 250; ch_type = "mpu"; ch_sid = […]
Perhaps a spray of Pam or a coating of oil on the balloon will solve the sticking problem. I have seen this recommended on other sites using balloons and string.
that is an awesome tutorial! i think these would look great as an outdoor decoration if you’re hosting a cozy garden party as well :)
I’m making this lamp tomorrow and I’m trying it with a layer of plastic wrap over the balloon so it doesn’t stick and I’m using modpodge, I’ll let you know how it goes :)
I have just found this idea, read the comments and have a few ideas. I would like mine to hang over a small table and chairs on my deck, under a overhang that will keep it from being rained on but am concerned about humidity softening the glue or fabric softener. I am wondering if, following a successful deflation of the balloon, if one might spray it with a clear polyurethane to waterproof it and give it more stiffness? I love this project! I will be heading to Goodwill and Salvation Army to search for lace soon! I would like to make it a bit more opaque, so as not to see the bulb so clearly, any ideas about covering the balloon with a sheer fabric first , maybe in strips? any ideas? ~Debra
For most projects like this, people use fabric stiffener or “White Glue” , brand names Elmers or Tacky glue. Fabric stiffener is found at hobby stores, as is craft glue. With white glue, you could even roll the ball around in glitter before it dried to give it a “snow” effect.
[…] made this lampshade this week out of crochet doilies that I learned from here. It didn’t turn out perfect but it has its […]
[…] Find the step by step directions at DOSFAMILY […]
[…] 11. Lace Lamp […]
i dont have grandma blankets. whot i doing
[…] Lace Lamp […]
[…] More info: here […]
[…] More info: here […]
[…] y fotos: Dos Family. Tags: creatividad, DIY, ecofriendly, Retro […]
[…] 2. Lampe en dentelle Plus d’info: ici […]
[…] Love this lace lamp by Dos Family. […]
Very nice post. I just stumbled upon your weblog and
wanted to say that I’ve truly loved surfing around your weblog posts. After all I will be subscribing in your rss feed and I hope you write again very soon!
Hi Isabelle,
This one is too beautiful a deal you’ve built here. I really wanna make this myself. Small questions I have before I start on this project.
1. Any reason why everyone is talking about using a round balloon only? Can’t we use an oblong balloon for a similar project? Will that not work for any reason?
2. I live in India, so getting Wallpaper gum around here seems to be very very difficult. Any other replacement ideas you could give? For example: Fevicol? or clear Varnish? I was suggesting clear Varnish so that eventually it would get a smooth exterior and dusting it would become similar as there’s a lot of dust where I live.
Any other ideas you can give for getting the cloth stuck on?
Isabelle: Hi Ashvyn,
thank you!
1. Well the only reason people are talking about round baloon I guess is because the end result – i think is more beautiful. But it will work woth a normal one as well. I also think the round big baloons are a bit better quality and therefo a better choice. I do not see working wiith a beach ball. I think it’s too hard but I guess people had succes with it.
2. I cant help ypu with what kind of glue youe have over there but I guess the glue cant be so strong it melts the baloon but it has to turn hard/stiff. Maybe wood glue and water will work?
I never had problem with them doilies sticking to the baloon so sorry cant help you with that.
Good luck
Isabelle
Thanks so much for the reply Isabelle. Will surely try your suggestion out with the wood glue (if I can find it). In the meantime, I’m also thinking of using starch with the cloth material to make it stiff, and then later painting it over with clear varnish. Maybe that might work.
I bought 3 balloons and at least 5 sets of cloth materials so that even if one project fails, I can restart the whole project again with a fresh set of raw material. Crossed fingers here. Love to you all the way from India.
[…] craftswoman Isabelle Dos started with a simple party-shop balloon, blown up big and wrapped in white lace place settings […]
Must follow you!
Hi I was wondering i do not have any cloth doileys but I do have paper ones? Would that work or do you think it would be too thin?
Made this over the weekend with my little girl and it looks just lovely in her bedroom, thank you!
I love this idea! I’m going to buy LED lights on sale after Christmas and make these for my wedding in May – and dye some of the lace PURPLE!!!!!! This is such a neat idea, I tried making some paper lanterns – FAR too much work. This looks awesome!!!!!!
I have done a craft sort of like this. I used a balloon and wrapped string around it and brushed on liquid starch. let it dry, pop the balloon. I then cut an oval hole in the front. I filled it like an easter basket.
[…] Paint Chip orbs, Readymade, 2.) lace doily lamp, Dos Family, 3.) Knitted hot air balloons, Butterfly Love 1, 4.) paper baubles made from paperbacks, no […]
[…] is the DIY Lace Lamp! I am so making this in my down time! Full instructions can be fund at the DOS FAMILY photo via […]
totally wow!! Can’t wait to do a blog article and link back at http://www.happyweddingannversary.co.uk!
I haven’t tried this project yet, but I am going to soon. My plan is to cover the balloon with plastic saran wrap – NOTHING sticks to plastic wrap, not even super glue :-)
Next, I am going to use dry doilies and hot glue them in place around the balloon, being very careful not to get any hot glue on the balloon because that would cause the balloon to pop. After I have my doilies all glued together and in place around the balloon, I am going to use a foam brush and simply paint the doilies with clear matt varnish (polyurethane). I cannot see this method failing – lol, but we’ll have to wait and see. Wish me luck!!
Hey! I could have sworn I’ve been to this blog before but after reading through some of the post I realized it’s new to me.
Nonetheless, I’m definitely delighted I found it and I’ll be book-marking and checking back frequently!
[…] Lámpara de encaje o macramé: ¿tienes guardado algún tejido a macramé que ya no te guste? Bueno, lo puedes convertir en una lámpara de techo en pocos pasos. […]
Lovely! I’m thinking you could also use Mod Podge that you get from the craft store and put 3-5 coats on – it dries clear and is very strong. I may have to try this! Thanks for sharing your idea.
[…] you can create a slightly more feminine version by using lace doilies instead of string, or go industrial and use galvanized wire (balls might work to create this shape […]
I Love this! Looks so Pretty! Gotta make one. But can I use Mod Podge or what kind of glue? Thanks.
[…] it’s pretty and you want to make it some day? That was definitely the case for me and this doily lamp. I finally got the chance to make it, and love how it turned […]
[…] Dosfamily have this gorgeous doily […]
[…] ~Credit: Lamp~ […]
[…] ~Credit: Lamp~ […]
[…] ~Credit: Lamp~ […]
ciao ho letto questo articolo sono arrovata a te tramite una ragazza che parlava del tuo blog su facebook ,
anche io ho un blog dove inserisco consigli per le amiche sul fai da te e pensavo di inserire un articolo citando il tuo spero non ti dispiaccia prima di pubblicarlo attendo che tu mi autorizzi grazie
enza .
Hi Isabelle, thank you for posting such an inspiring tutorial. I tried it out and made a beautiful ball for my daughter’s birthday party: http://blog.stephbond.com/2012/09/our-big-girls-spring-ice-cream-5th.html. I also linked back to this tutorial. Thanks again! Steph
This is really amazing!!
This is so Shabby Chic and I have so many doilies, can’t wait to try. Wonder if i can us Mod Podge, it works on other doily projects. Thanks for the great idea.
This is a great idea. I think I am going to make some smaller ones for my daughters room. No lights in them. Just as decoration!
Hi, great lamp! just wondering if you know what other materials can be used? I’m wondering about felt (for a soft light) or paper?
Thanks!
Stephanie
amazing! I guess Im gonna use this technique in my coming Art project! Thanks for the great idea! <3<3
[…] More info: here […]
[…] More info: here […]
Such a lovely idea, I’m going to make Christmas baubles in the same way. ELL Xx
[…] found this tutorial particularly interesting…http://dosfamily.com/2011/01/lace-lamp/ This entry was posted in Uncategorized by rachelmmu. Bookmark the […]
[…] Source […]
[…] Een heel elegante lamp van kant, van de toffe blog ‘Dos Family’: Klik hier […]
[…] Dantela, lipici si un balon. Dantela este mai bine sa fie usoara. Sursa […]
[…] for this is my childs nursery! Anyways it is super simple and VERY cost friendly!! So head on over HERE to get the tutorial!!! Be Sociable, Share! […]
[…] artesana sueca Isabelle Dos empezó con un simple globo de cumpleaños, inflado bastante grande, envuelto con encajes blancos y […]
I love it when folks get together and share opinions.
Great site, keep it up!
Hi there!! I featured your lovely lace item here on my blog :)http://artbyjacy.blogspot.com/2012/11/fabric-fun-friday-lovely-lace.html
Blessings,
Jacy
[…] cheap and sooo gorgeous! I’m definitely try to make one. The original tutorial, step-by-step here.4-Craft some Thanksgiving decoration. Let Pinterest inspire you ;)5-Cut out a brand new pair of […]
[…] O si preferís, la lámpara de encaje: […]
[…] of pendant lamp. My other two attempts failed. They failed hard. First, I attempted this lovely doily pendant lamp. I used an exercise balloon and after about 32 hours, before the wallpaper glue dried, the […]
Beautiful! Definitely trying this!
However, I do suggest not letting the child blow up the balloon. A family friend of ours, his 11 year old daughter, was blowing up a balloon and accidentally sucked in instead of blowing out. Since that fatal accident, I strongly dislike balloons anywhere around children. Please be careful and let an adult do the balloon blowing!
Can’t wait to put these up in my craft room!!
[…] a very pretty doily lantern posted on Isabelle and Jenny’s blog named DosFamily. See tutorial here. […]
I am thinking for the balloon in the USA you want what we call a punching balloon. Its very thick and round not egg shape like regular party balloons. We used to play with them as kids you can still find them they come with the big rubber band for a handle so you can bop it…
[…] i merletti ingialliti di famiglia e non ritenere blasfemia riutilizzarli creativamente, ecco un’idea di Isabelle McAllister, una blogger che ha riunito le vecchie trine fatte a mano per realizzare un […]
[…] Lace Pendant How great is this lace light!? Seriously. If I wasn't a lace convert before I saw this, I definitely am now! Isabelle over […]
Preciosa esta lámpara, en cuanto a la pega la cola plástica suele funcionar muy bien para este tipo de trabajo, le da dureza y protege el encaje, puede darle dos o tres manos antes de pinchar el globo y colocar el cable con su tapa.El cable puede ser largo para llevar la lámpara a un extremo de la habitación y colocarse un interruptor,
[…] I’ve seen some pretty amazing creativity in brides lately, using lace appliqués on vintage mason jars and using them as vases, candle holders, and hanging lanterns. Or, better yet, creating their own lace balloons. This is kind of along the lines of the paper mache’ projects we did as children in grade school; gluing lace or doilies to round balloons with wallpaper glue, popping out the balloon, and then using them as hanging decorations and lamps. They look fabulous hanging from the ceiling or trees at your reception. Lace ribbon is also a cheap and easy way to integrate lace into your wedding theme. You can use it to trim the tables, vases, and other decorations. Source: Crafts By Amanda Instructions: Dos Family […]
[…] Fundas enchuladas -> Tutorial aquí (PDF) Lampara de encaje -> Tutorial aquí Mesita de noche -> Tutorial aqui Has tu propio cobertor -> Tutorial aqui […]
[…] instructions for this are a little more complex, so head on over here to view the […]
[…] 7. Lace Doily Pendant Light – DosFamily […]
[…] Use a balloon and some lace doilies to create this gorgeous lamp found on DOS Family. It’s actually pretty simple to make and looks stunning. I could imagine a whole lot of these […]
Hej !
Tänkte bara säga att man kan lätt koka ihop lim själv med att använda rismjöl eller fint majsmjöl och koka ihop med vanligt vatten. Bra om man vill pyssla med barn och inte utsätta dem för en massa kemikalier.
Jag brukar använda detta lim även till papier-mâché pyssel och mycket annat det är hållbart och går att tvätta bort med lite skrubbande och framförallt miljövänligt.
[…] More info: here […]
This is my NEW project that I will do tomorrow, and I cant thank you enough for this awesome craft idea as they are simply elegant and beautiful!
I know some people have had problems with the wallpaper glue, so I wonder if Mod Podge would help to fix their issue (as that is what I am going to be using instead of the wallpaper glue) and I will report how it works!
Thanks again and keep the wonderful craft ideas coming!!!
[…] koronkowy abażur […]
Could you use Mod Podge instead of wallpaper glue?
[…] Lace lamp/Doiliy Lamp http://dosfamily.com/2011/01/lace-lamp/ Laissez les bon temps rouler! Going to church doesn't make you a Christian any more than […]
I love this idea!
Tanks kim!
This is absolutely beautiful! My theme to my wedding this Summer is lace/vintage! We’re going to try to make a bunch of different sized ones to hang from our tent at the reception. I’m not doing to do the light inside, I thought they’d look pretty enough just hanging everywhere. Thanks agin for posting this!:)
[…] here or on the photo for the full instructions for Doily Lamp at the Dose Family blog. Interestingly, […]
I will definitely DO this! Thank you!
[…] http://dosfamily.com/2011/01/lace-lamp/ […]
Olá Isabelle, eu gostaria de ver uma foto com a lâmpada acesa, você tem para postar? Obrigada!
Amei,muito lindo mesmo parabéns!!
Hey! I plan on making this real soon, it looks absolutely stunning! One question though, I don’t wallpaper glue is available here, would TONS of PVA glue help?
I tried making a wool version of this a long time ago but the balloon wound up sticking to the thread!
I can’t get doilies here, so I plan on using lace. Any tips or comments would be greatly appreciated. Thank you!
I’m sorry i can’t help you more than I’ve written in the post but if you scroll around the old comments – you will see many different variations from different countries and how they made it. I think lace will work just fine! Good luck
[…] MOEILIJKHEIDSGRAAD: 1 | BRON […]
[…] Forrás Forrás […]
[…] room” 49. Create a crafts/sewing space in the “reading room” 50. Make a lace lamp 51. Make a photographic cushion 52. Have a retro outdoor film night 53. Recipe to try: Breakfast […]
[…] Lampe2 Lampe3 Lampe4 Lampe5 Lampe6 Lampe7 Lampe8 Lampe 9 Lampe10 Posted in […]
[…] For the full tutorial visit Dosfamily […]
[…] Φωτιστικά από… σεμεδάκια Posted in ανακυκλώνω-ξαναχρησιμοποιώ, βελονάκι, κατασκευές 02/15/12 doily lamp […]
You can make your own basic paper glue by boiling up a smooth thin mixture of flour, water and salt. Great for use in the kid’s homemade papier-mâché projects!
Or, for an easy and great smelling wallpaper paste try the following recipe:
WHAT YOU NEED
1 cup flour
3 teaspoons alum powder (or 3 tbsp basic table salt)
10 drops clove oil (or tea tree oil)
Approximately 3 cups of water
You can use cornflour or rice flour for a finer paste—but basic wheat flour works well and is cheaper.
Clove oil and tea tree oils are natural preservatives with antimicrobial and antifungal properties.
Alum is a salt you can buy in powder form online or from a chemist. In the form of potassium aluminum sulphate it is commonly used in preserving and food processing and as sodium aluminum sulphate it is an ingredient in commercial baking powder. Alternatively you can use basic cooking salt.
WHAT TO DO
Mix the flour and alum in a large saucepan. Add water a little at a time stirring often to make a smooth runny mixture.
Put on low heat, stirring constantly, until the flour is cooked and the mixture thickens. Add more water if necessary to maintain an even texture.
Allow mixture to cool and stir in the oil.
If the paste goes lumpy, put it in a kitchen blender and give it a wizz.
Pour into a glass jar with a screw top.
Makes 1 cup of glue that will keep for at least 2 weeks in the fridge.
Apply with a wide glue brush.
I went to the store the wall paper paste is !10.00! for a small jar!Seriously! all I remember is my father making up the concoction, with a bit of Child labor i mixed, mixed, and mixed. You can make whatever strength you want, and the smell . I did peppermint….
I also found you can put a1.
1. EMBROIDERY HOOP,small or medium one your choice
NOTE:
( 2nd hand store have them for .25cents about…)
2.: LAY THE LACE ON TOP of ballon.across, the hoop, edge,
2a: NOTE;
DO NOT TUCK IT UNDER THE HOOP,HAVE A LIP THAT YOU CAN CUT AROUND IT.WHEN DRYED.
(IF YOU WANT TO TUCK IT OVER, AND UNDER HOOP, YOU CAN MAKE IT MORE
STURDY.
3. PUT THE OTHER HOOP OVER IT, THEIR IS A TWIST ON THE HOOP .
TURN THE SCREW.
TURN IT LOOSE
TIGHTER, WAIT TO DRY
4. YOU CAN ONE HAVE HOOP ON AND THREAD IT JUST LIKE PICTURE OR
TRIM IT, THEN THREAD IT EITHER WAY ITS GOING TO SO FLY…..
You can make your own basic paper glue by boiling up a smooth thin mixture of flour, water and salt. Great for use in the kid’s homemade papier-mâché projects!
Or, for an easy and great smelling wallpaper paste try the following recipe:
WHAT YOU NEED
1 cup flour
3 teaspoons alum powder (or 3 tbsp basic table salt)
10 drops clove oil (or tea tree oil)
Approximately 3 cups of water
You can use cornflour or rice flour for a finer paste—but basic wheat flour works well and is cheaper.
Clove oil and tea tree oils are natural preservatives with antimicrobial and antifungal properties.
Alum is a salt you can buy in powder form online or from a chemist. In the form of potassium aluminum sulphate it is commonly used in preserving and food processing and as sodium aluminum sulphate it is an ingredient in commercial baking powder. Alternatively you can use basic cooking salt.
WHAT TO DO
Mix the flour and alum in a large saucepan. Add water a little at a time stirring often to make a smooth runny mixture.
Put on low heat, stirring constantly, until the flour is cooked and the mixture thickens. Add more water if necessary to maintain an even texture.
Allow mixture to cool and stir in the oil.
If the paste goes lumpy, put it in a kitchen blender and give it a wizz.
Pour into a glass jar with a screw top.
Makes 1 cup of glue that will keep for at least 2 weeks in the fridge.
Apply with a wide glue brush. of lace, for the opening, when you done, going AROUND, you put the other hoop to secure it. When dry you have hole that is sturdy and look!!!!! Fabulous.!!!!!
Very nice craft. It sure gives a different glow when it is lighted. I have different materials here that will be of good pendant light too. Thank you for the idea.
I absolutely love this! I have always for some reason had an obsession with lanterns…especially ones with a light. So, when I saw this out of the corner of my eye; I about jumped straight into next week!
I witnessed my aunt making easter eggs with a balloon, elmers glue soaked yarn, and lots of air. I remember the first time I saw her poke the balloon and it popped. I bet you my face lit up like a Christmas tree on the fourth of July! LOL! Anyways…I remember being so mesmerized because I naturally was an old soul drawn to art for some reason? I thought of the time when I was way younger and saw her making them as soon as I saw the doily lamp. Thanks for the trip…duh! Down Memory Lane! LOL!
I am uber excited about putting my own spin on this NIFTY idea and (can’t you tell) I cannot wait to see the finished product!
Thanks for being so amazingly creative and allowing others to share in the JOY that arts and crafts bring to people who do what they do. Also MAJOR kudos to you for later explaining parts in further detail. Like I said in the beginning…”I LOVE THIS!” It’s my ABSOLUTE FAVORITE craft for 2013 thus far.
THANK YOU!!!
Jeremiah
Houston, TX
Thought you might like to know your project was reblooged here [ http://www.moredesignplease.com/moredesignplease/2011/3/4/diy-doily-lamp.html ] and they combined your pics in a way where it pretty much gives the details of how to make it without having to click through to your site. I just would like to see you get proper rewards for your project and your blog!
this is cool, like it :-)
How wonderful! I have so much spare lace. I can’t wait to give it a go! Thank you so much for the idea. And your photos are beautiful.
[…] Forrás […]
[…] Kreasi lampu ini bermula dari semangat Do It Yourself (DIY) yang banyak berkembang di negara-negara Eropa dan Amerika Serikat. Untuk menyalurkan hobi dan mengisi waktu luangnya, Isabelle McAllister menciptakan dekorasi lampu unik untuk membuat pencahayaan di kamar menjadi lebih lembut. Lampu yang dinamakan Lace Lamp/Doily Lamp ini terbuat dari bahan yang mudah dijumpai seperti kain renda dan balon. Untuk penjelasan dan langkah-langkah pembuatannya dapat dilihat disini […]
i used the same method t make a paper lamp…. it works great…. this has been on my to do list for a long time…. just so busy making other things that cant decide which project do i do next….
Este minunat!
Am si eu acasa cateva mileuri din macrame. Ma gandeam sa le arunc, dar vazand ce ai facut, m-am razgandit!
Felicitari!
[…] DIY lace doily lamp and DIY lace candle jars […]
[…] muy original. Con este DIY, creas un elemento lumínico a la vez que uno decorativo.Aquí tienes el ENLACE a una página en la que te enseñan los pasos a seguir.#gallery-1{margin:auto}#gallery-1 […]
Awesome love it!
[…] Encher o balão e pendurar em algum local com o barbante. Passe a cola por toda a renda e vá colocando pedaço por pedaço no balão, lembre-se de sobrepor as extremidades para unir as rendas. Espere secar por mais ou menos um dia e estoure o balão com uma agulha. Finalize com uma amarração de arame e coloque a luminária dentro. Veja o post original aqui. […]
Isabele
Adorei seu post. Ficou muito lindo este lustre. Vou procurar as rendas e fazer para a minha sala.
[…] source […]
[…] Dos Family – Lace Lamp Tutorial […]
I am going to try this and use twinkling mini xmas lights in it. I think using some clear shredded Easter grass or something comparable to help keep the lights supported and disbursed evenly in the sphere will help. With xmas lights, heat is not an issue.
[…] tutorial on making doily bowls and on the right is a lace doily light fixture, ( find out more at Dosfamily.com) look at the beautiful shadows it puts out.Another great option if you don’t want to damage […]
Love this Idea! I shared a link to this on my blog,
Hope you don’t mind.
Your doily lantern is just beautiful
http://maggieoverbystudios.com/2013/09/04/making-doilies-modern/
its a wonderfull idea im sure going to try it out and share the way i did it if i will do something extra to make it more hard and strong … im thinking something like secure spray or something like that but im also thinking isnt this dangerous? i mean is it possible to catch on fire? or something like that?
I thank you for sharing your brilliant Idea!!!! My daughter and I are in the process of making 25 of these for her wedding next summer. This is what I have had to do to make this the easiest for this many. Lace, I’m buying buy the yard different patterns and cutting into 5 in circles. Doilies have been hard to find and very heavy, The thick party balloons I push and wiggle on the table till they make the circle shape. So it doesn’t look like a egg:). I’ve been using a product called stiffy..another coat after all dry. I left a opening( 2in)where the ballon is tied and fold (curled)back lace to dry so I can put ribbon when they are hung on the globe lights I bought.
[…] look! This lovely DIY Lace Doily Lamp is now a posibility thanks to a great tutorial! Link- Dos Family Share September 25, 2013 by Tara Edwards Posted in DIY, Home DecorTagged DIY lace […]
[…] Here is the lamp I will be making this weekend. Share this:TwitterFacebookGoogleLike this:Like Loading… […]
[…] DIY project and photo credit to dosfamily.com […]
very nice…………thanks for giving such a wonderful simple idea…..
[…] DIY project and photo credit to dosfamily.com […]
[…] dos family […]
[…] DIY and photo credit to dosfamily.com […]
Very nice. Thinking of doing this but the next thing comes in mind. How do you clean it?
[…] Kijk voor meer foto’s en de instructies op deze site. […]
[…] http://dosfamily.com/2011/01/lace-lamp/ […]
[…] your own Doily lamp shade with three simple steps. Spread The Word…0000 Related PostsHow To Make A Light Bulb VaseBright ideasDIY Personalized […]
[…] via Dos Family, montage par More Design […]
Genial!!!!
This is a beautiful idea ty so much for sharing, something I thought of while i was reading the comments my mom does upholstery she uses a 3m spray glue that might work for when the glue dries to give it the extra strength , just a thought hope it helps
[…] Lien DIY suspension […]
[…] terminer, je vous laisse avec un diy d’un de mes blogs […]
[…] terminar os dejo con un diy de uno de mis blogs […]
[…] tablecloths, wallpaper glue, nice looking cord and lamp fitting. Below are the necessary steps. DIY Lace Lamp – Dosfamily (adsbygoogle = window.adsbygoogle || []).push({}); (function() { var li = […]
This is lovely! When I make mine, I’m going to use battery operating candles. Thank you for sharing this!
Happy Holidays!
I would recommend using an LED bulb. They are cold and they save a lot of money on your power bill!
Today, I went to the beach with my kids. I found a sea shell and gave it to my 4 year old daughter and said “You can hear the ocean if you put this to your ear.”
She put the shell to her ear and screamed. There was a hermit crab inside and it pinched her ear.
She never wants to go back! LoL I know this is completely off
topic but I had to tell someone!
These are beautiful! Would Mod Podge hold just as strongly as wallpaper glue? I’m looking forward to making this. Thank you!
Holly
[…] Lace Lamp source @ dosfamily […]
bonjour , vous expliquez par étape , pourriez vous le traduire en français merci
[…] Have fun! Grab the full instructions right here…Dos Family – Lace Lamp Tutorial […]
[…] source […]
Would this work with pink lace and wood glue? X
Lovely idea! I am looking forward to trying it! I didn’t read all of the comments since there are so many. Several people asked about using Modge Podge and there was a comment by someone saying it works. Here in the United States, we have a product called Stiffy Fabric Stiffener. I’ve used it for other fabric projects and it would be perfect for this.
Latex Punching balloons work great and you can deflate them. I saw a box of 60 for $13.00 on Ebay.
[…] Source: Dos Family […]
It’s beautiful and simple! Thanks for sharing! It gave me lots of ideas in making other decorations using balloon and dolly. Thanks!!
thank you right back / isabelle!
[…] en lampa gjord av gamla spetsdukar. Jag använde mig av en kombination av instruktionerna i den här guiden och en grytlappslampa i den här boken som jag verkligen älskar, så himla rolig och […]
Hey..
Thank you so much for sharing this. I absolutly love it! It’s such a briliant and beatiful idea. And i’ve been looking for something to do with theese pretty doilies for a loooong time. :)
Allowed myself to write a blogpost, on how i made a lamp like this, on my new, Danish blog.
http://krea-blog.blogspot.dk/2014/03/hjemmelavet-rustik-blonde-lampe.html
Knus og kolbøtter fra Danmark :)
Hello, i feel that i saw you visited my site so i came to
go back the prefer?.I am trying to in finding issues to improve my
site!I guess its ok to make use of some of your concepts!!
I am working on some outdoor idea for my Camper and a flower garden setting, I was thinking of trying to make these smaller and use a string of twinkle lights. Have you used these outside and do they hold up in weather, rain especially. I was wondering if a clear spray paint might seal them. Any thoughts?
DebraAnn I don’t know how they will work with humidity and such for outdoor. The ones I made with and soaked in wood glue are really hard and more like plastic now. But I suggest you make a small and watch how it can handle the outdoors! / Isabelle
[…] Designed by Isabelle Mcallister […]
[…] Designed by Isabelle Mcallister […]
[…] Lampă din mileuri. Design: Isabelle Mcallister […]
[…] 10.) Doilies and art supplies make a pretty lace lamp. dosfamily […]
[…] Designed by Isabelle Mcallister […]
[…] make awesome lamps. Jeeves & Wooster 10.) Doilies and art supplies make a pretty lace lamp. dosfamily dosfamily 11.) This cloud cutout lamp is simple, but beautiful. […]
[…] dosfamily […]
[…] Designed by Isabelle Mcallister […]
[…] © Изабель Макалистер […]
On peut te dire que ce n’est guère incohérent !
[…] Jeeves & Wooster 10.) Podmetači i umjetnost materijala čine prilično čipkaste lampe. dosfamily dosfamily 11.) Ovi oblaci od papira su jednostavni ali lijepi. […]
[…] Designed by Isabelle Mcallister […]
[…] dosfamily […]
Hi there! Can you use paper doilies? I don’t want to use them as lamps, but rather for hanging at my wedding.
[…] Designed by Isabelle Mcallister […]
[…] Image: Dosfamily […]
[…] ud af dem, for de var for gode og for flotte, bare at smide ud, synes jeg. Så da jeg faldt over idéen her, om at lave en lampe ud af dem, var jeg nødt til at forsøge det, også kunne jeg da ligeså godt, tage billeder […]
Good post! We are linking to this great content on our website.
Keep up the good writing.
[…] Designed by Isabelle Mcallister […]
[…] Como Fazer (em inglês) | Como Fazer (em português) […]
It will be better if you made more photos over your hands when you make the lamp. I do not understand what follow after glooing… how cut the entire balloon? it collapse! How put a cord? how install to a power source?
[…] Lace lamp /doiliy lamp – diy | dos family Hmmm fanns inge runda ballonger där jag bor så sonen fick offra sin badboll. nu så håller det på och torkar. men undrar om det går att få dän bollen.???. […]
This is indeed very beautiful! Can I use paper doiles or only crochet?
Thanks! Aditi
[…] Como Fazer (em inglês) | Como Fazer (em português) […]
[…] Como Fazer (em inglês) | Como Fazer (em português) […]
[…] dei vecchi centrini che non sai come usare? oppure ne hai fatto scorta in una bancarella? Su Dos Family c’è un bellissimo tutorial per realizzare una lampada usando proprio dei vecchi […]
[…] a cosy relaxing ambiance we found the project for you. Thank you DOSFAMILY for the great tutorial. Here is the […]
[…] Pomysł na nietypową lampkę, która od dawna po głowie mi chodzi. […]
This DIY is amazing I have it in my 5 DIY for a Rainy day! Thank you for such a great inspiration.
http://www.livingeneva.com/2014/09/5-diy-for-a-rainy-day/
[…] 15. Lace doily pendant lamp diy, on Dos Family. […]
[…] Designed by Isabelle Mcallister […]
[…] crear en nuestro hogar de manera rápida y sencilla. En este caso en particular tomamos la idea de Dos Family en la que se elabora una preciosa lámpara globo; la que es cubierta con un simple tapete para […]
Any Americans try this? How many dollies did it take? Did you use a 36″ balloon? What size dollies looked best?
[…] Кружева, клей и шар. Кружева лучше брать легкие. Источник […]
[…] procedura seguita da Dosfamily, per creare questo elegante complemento di arredo, è sostanzialmente uguale, con la differenza che […]
This may have been mentioned before; I haven’t read all the
responses. The glue that you buy for doing decoupage would
probably work great for this. It dries clear. Also you could mix
a little water in Elmer’s glue or similar glue and paint it on.
I also have some round light bulbs that I saw online.
Love this project ! You could buy wide lace also, I guess.
EL in NC, USA
[…] via hammerandheels.blogspot.com […]
[…] Diseñado por Isabelle Mcallister […]
[…] Grandma CzarSubscribe Here: http://www.bit.ly/12rVBFVPinterest Link: http://dosfamily.com/2011/01/lace-lamp/Alt Doily Lamp Video: […]
[…] Quelle: dosfamily.com […]
This project looks quite simple and everyone could do this at home. That’s great idea to make something by myself in my own place :)
[…] tutorial make lamp out of doilies diy / … – How to make a lamp out of old doilies / lace. Hur du gör en egen lampa av gamla virkade /stickade lampor…. […]
[…] tutorial make lamp out of doilies diy / … – How to make a lamp out of old doilies / lace. Hur du gör en egen lampa av gamla virkade /stickade lampor…. […]
[…] tutorial make lamp out of doilies diy / … – How to make a lamp out of old doilies / lace. Hur du gör en egen lampa av gamla virkade /stickade lampor…. […]
What a nice idea! i came here for seo reasons, but stayed here for personal reasons, although i m male ;)
[…] tutorial make lamp out of doilies diy / … – How to make a lamp out of old doilies / lace. Hur du gör en egen lampa av gamla virkade /stickade lampor…. […]
[…] tutorial make lamp out of doilies diy / Gör … – How to make a lamp out of old doilies / lace. Hur du gör en egen lampa av gamla virkade /stickade lampor…. […]
[…] un peu difficile de savoir quel produit elle a exactement utilisé. Enfin, comme elle nous donne toutes les étapes de réalisation du projet ici, vous pourrez également le […]
[…] gesehen bei: dosfamily.com […]
[…] Designed by Isabelle Mcallister […]
[…] cheap and sooo gorgeous! I’m definitely try to make one. The original tutorial, step-by-step here.4-Craft some Thanksgiving decoration. Let Pinterest inspire you 5-Cut out a brand new pair of […]
[…] This doily light pendant would be perfect for the popular cottage style home decor. It’s labor intensive but none of the steps are difficult. Learn how to create it here. Another blogger created a similar design here. […]
thanks
[…] Design: Isabelle Mcallister […]
[…] dosfamily […]
[…] Isabelle McAllister came up with a tutorial that can help you bring an air of delicate grace to any bedroom or nursery. Got any doilies around the house, inherited from some old aunt or grandmother? Get some balloons and crafting glue, inflate one balloon, then stick doilies all over its surface. Allow the glue to dry out completely, then pop the balloon and insert an electric wire and light bulb inside. Presto: here’s your lacey doily lamp! […]
[…] to try this? Check out dosfamily‘s […]
[…] glue, lace and a basic lighting kit. Have fun! Grab the full instructions right here… Dos Family – Lace Lamp Tutorial Image Source: […]
[…] Lace Balloon | DosFamily […]
[…] Tutorial @ dosfamily.com […]
[…] Lace Lamp […]
[…] que había otra lámpara muy bonita que podéis hacer fácilmente. La han hecho en la web dosfamily con un globo y mucha cola. ¡Manos a la obra! 12 comentarios Sin categoría Tutoriales […]
[…] Designed by Isabelle Mcallister […]
[…] To view more details , Click Here […]
[…] Instructions: Here […]
[…] to try this? Check out dosfamily‘s […]
[…] DIY – Dos Family – How to make a lamp out of old doilies / lace. Hur du gör en egen lampa av gamla virkade /stickade lampor. […]
[…] encaje es uno de los elementos que mas grita vintage, estas, de las que puedes ver un tutorial AQUI están hechas con la superposición de tapetes de encaje sobre un globo inflado y luego cubriendo […]
[…] but you can reuse them to give your lamp shade a more homey, but still contemporary, feel. See the tutorial here on Dos Family’s […]
[…] Designed by Isabelle Mcallister […]
[…] voici le lien vers DOSFAMILLY qui est encore en anglais. Mais les images parlent d’elles […]
[…] tutorial, by Dose Family this time, that walks you through the creation of a lace lamp. It actually looks fairly easy to […]
[…] tutorial, by Dose Family this time, that walks you through the creation of a lace lamp. It actually looks fairly easy to […]
[…] 出典dosfamily.com […]
[…] 出典dosfamily.com […]
[…] Zdroj / Čipkované tienidlo: dosfamily […]
[…] el encaje es uno de los elementos que mas grita vintage, estas, de las que puedes ver un tutorial AQUI están hechas con la superposición de tapetes de encaje sobre un globo inflado y luego cubriendo […]
[…] Paint doilies with wallpaper glue, then laid them on a balloon to dry. When the whole thing is hardened, pop the balloon with a pin and run hanging lamp hardware through the hole. Tutorial via dosfamily. […]
[…] overlap each other Let dry at least one night Pop the balloon ADMIRE Via More Design please Via Dos Family 2 Commentaires Par […]
J’ai essayé plusieurs fois avec la colle à papier peint, mais le résultat n’est pas assez dur. Pourriez-vous me dire quel type de colle va le mieux?
Merci
[…] To make your own lamp, follow Jenny’s directions […]
[…] Designed by Isabelle Mcallister […]
[…] crédits: Isabelle Mcallister […]
[…] to try this? Check out dosfamily‘s […]
[…] More info: here […]
[…] Kreasi lampu ini bermula dari semangat Do It Yourself (DIY) yang banyak berkembang di negara-negara Eropa dan Amerika Serikat. Untuk menyalurkan hobi dan mengisi waktu luangnya, Isabelle McAllister menciptakan dekorasi lampu unik untuk membuat pencahayaan di kamar menjadi lebih lembut. Lampu yang dinamakan Lace Lamp/Doily Lamp ini terbuat dari bahan yang mudah dijumpai seperti kain renda dan balon. Untuk penjelasan dan langkah-langkah pembuatannya dapat dilihatdisini […]
[…] to try this? Check out dosfamily‘s […]
[…] spotted this beautiful doily lampshade tutorial too. I will be making one of these for our stairwell, but I thought it might translate to a small […]
[…] Tutorial: dosfamily.com […]
[…] PDF File Name: Lace lamp – diy | dosfamily Source: dosfamily.com » DOWNLOAD « […]
[…] crédits: Isabelle Mcallister […]
[…] Read More: Lace Lamp at Dos Family […]
[…] Grandma Czar Subscribe Here: http://www.bit.ly/12rVBFV Pinterest Link: http://dosfamily.com/2011/01/lace-lamp/ Alt Doily Lamp Video: […]
[…] Lace lamp/Doiliy Lamp – DIY […]
This is a great idea for a lamp
Good article, thanx :)
[…] Designed by Isabelle Mcallister […]
[…] Dos Family – Lace Lamp Tutorial […]
[…] Tutorial make lamp out of doilies diy / Gör lampa av virkade dukar | Dos Family […]
that`s amazing tutorial i really like the step by step tutorials make your DIY easy and perfect, thanks for sharing ¦.
[…] Image Credit: Designed by Isabelle Mcallister […]
[…] Designed by Isabelle Mcallister […]
[…] cuantos y no sabes qué hacer con ellos? ¿Has visto estas lámparas? Esta es de Dos family: Duitang: Y A lovely thing: Pegados por dentro de un bote de cristal hacen un original […]
[…] DIY Lace Lamp – Dosfamily […]
Aktuelle Nachrichten und schnelle Hintergründe aus aller Welt.
Folgende Themen erwarten dich auf unserem Newsportal
– Garten Bauen, Wohnen
– internationaler Nachrichten
– Internet, Ecommerce
– Logistik, Transport
– Medizin, Gesundheit, Wellness
– Recht
und viele weitere Themen erwarten dich!
Aktuelle Nachrichten erwarten dich auf Presse-Nachrichten.de
Wir freuen uns über deinen Besuch!
aktuelle news
[…] DIY Lace Lamp – Dosfamily […]
[…] source Quelle: dosfamily […]
[…] Vai al tutorial […]
I used Elmers Glue (75%) mixed with a little water (25%). I thoroughly soaked the doilies then applied. I let dry for two days, then brushed more of the glue/water mixture all over; let dry for two more days, then popped balloon. I worked perfectly and the doilies are very stiff; I think the second coating helped a lot.
[…] Just take help of balloon to turn the doilies into a pendant glob lantern or lampshade, a life hack to put everyone in amazement! Made By Isabelle Mcallister […]
I just try the idea and love it, i hope if there is any option i will send you my image of diy lace lamp.
I believe that the many coats of wall paper glue helped create a sturdy base for the fabric stiffener to work out so well!
http://xayhoboi.com.vn/tin-tuc/don-vi-thi-cong-ho-boi-uy-tin-hang-dau-tai-quang-binh-263.html
Thanks a lot for some creative ideas!
[…] Tutorial in full at dosfamily.com […]