


Bow Braid tutorial / rosettfläta steg för steg

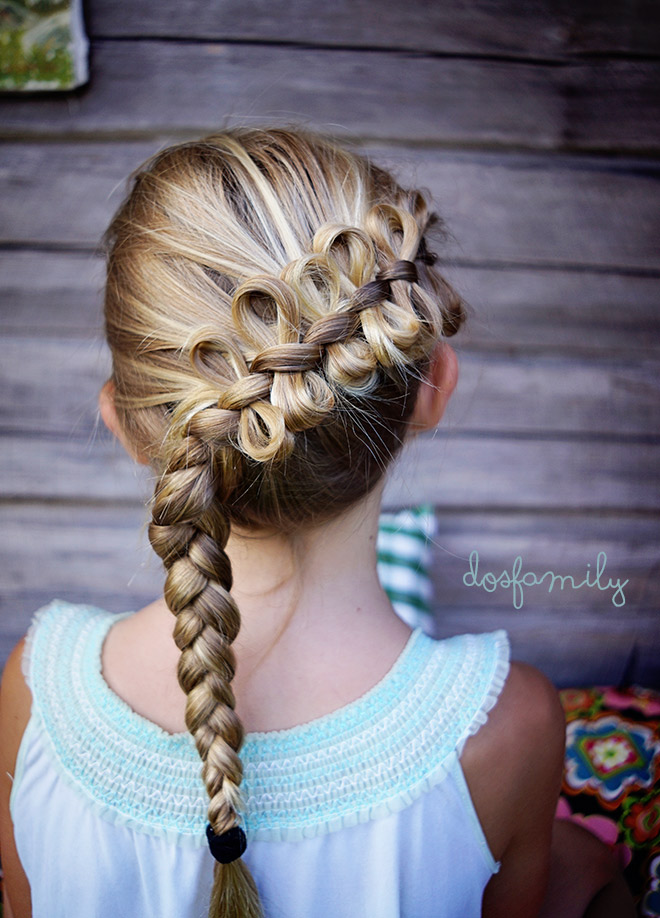
This summer we’re been having braid school at Casa McAllister. I consider myself being a very handy woman but somehow braiding has been hard for me. So this was really a tongue twister as in concentration. This looks like a really hard one to do but actually easier than you think! Ok let’s do a step by step tutorial. Firstly – I think it’s easier if the hair is a little wet, maybe put in some mousse or hair product.

Step 1: Do a partition of the hair. From about the eyebrow to the top of the head and around on to the other side.

Step 2: Collect all the hair – the bangs and some more on top of the head in a knot. That hair is later going to become the bows.

Step 3: Make a inside out braid aka Dutch braid. It’s like a braid laying on top of the hair. Instead of doing a normal braid when you take each piece of hair above the other you do it underneath every strand of hair. Start somewhere above the ear as close to the forehead as you can.

Step 4: Do the Dutch braid diagonally so it stops under the other ear and the just keeps on hanging loose.

Step 5: Now it’s time for the bows. Use a hairpin with long legs or I didn’t have one at home so I made a loop out of 25 cm wire it worked perfectly fine as well. Put the fold of the hairpin in under the top of the Dutch braid. And take out a little part of the bangs.

Step 6: Take the part of the bangs trough the wire. Now comes the tricky part. Try to keep/hold a piece of the loop above the Dutch braid while you pull the wire & some of the bangs trough the Dutch braid. Sometimes you have to practice this or you pull too hard so all the hair end up below the Dutch braid. Be gentle!

Step 7: So one loop is gonna be above the braid and the other loop is below. But it’s all the same strands of the bangs.

Step 8: Pull out the wire and then start again. Put the wire through the next top braid and take another partition from the bangs. To make another 8. The little tail that hangs out – just leave it. It’s gonna be hidden by all the other bows / loops. You can tuck them in at the end.

Step 9: Continue to do the same until you used up all the bangs. Use some hairspray to keep it all in place. You can even put in some hairpins to really make it hold. The looser you make the Dutch braid the looser the whole construction with the bows/loops will be.

Done! It’s really crazy and bombastic still sculptural in a way!

Good luck with you hairdo!
xxx
Isabelle
6 Comments
Join the discussion and tell us your opinion.
Så jäkla fint! jag är hopplös med frisyrer kan inte ens göra en inbakad fläta.
måste lära mig.
j
men du kommer lära dig snart jen!
Waow! Så snyggt, själv har jag ruvat fram fyra söner så jag får beundra andras flätkonst (tills de kommer hem med flickvänner, då jäklar ska det flätas!) //Sanna
Haha Sanna – hon flätande svärmodern !
-alltså jag gillar min svärmor men hon vill liksom ba fläta mitt hår hela tiden – lite creepy eller vad tycker du?
dör så kul
MÅste provas, har ju en med världens man här hemma.
[…] Bow Braid By Dos Family […]